Showing posts with label No-Sew. Show all posts

Sunday, September 15, 2019

No-Sew Pumpkin Purse Tutorial


What is the one line every creative person you know has said?  Any guesses?  You'll laugh when you hear it.  Ready?... 'I COULD MAKE THAT'.   You're laughing now aren't you?  Because we all know it's SO true!  We have all seen something in a store or online and thought that we could do a better (or at least cheaper) job at DIY-ing it than we could buying it.  Sometimes this works out great and other times we spend a lot more time and money on it than it's worth.  I know this to be true not just for myself but others because there is a world of memes out there:


[Disclosure: This post contains affiliate links to products that can be used to make this project.  Purchasing through these links may earn me a small commission at no extra charge to you. Thank you for supporting my blog.]

I had one of those projects this week (a successful one).  I saw a cute fall/halloween layflat online and part of it included a little pumpkin purse.  I did a quick search on Amazon and Target (because Target always has cute purses like this in the toddler/kids section) to no avail.  I didn't want to spend a lot of money because it was for my 2.5 year old.  She isn't that gentle with things, it's going to have a short lifespan (pumpkin= fall/Halloween) and the girl already has 4 other purses.  (ridiculous right?)  So instead, I made one.

The best part? You can make it too.  I did it entirely NO-SEW so that anyone out there could enjoy this project as much as we do.


Here's what you'll need:

- orange craft felt (plus black and green felt for the face & stem)

- interfacing (I'm sorry I don't remember the exact kind I used. It was a scrap! Anything to add stiffness will work great.)

- hot glue gun & glue sticks

- trim of your choice for the strap


How to make it:

I like to use tissue paper when I make my patterns because it's almost like using an actual sewing pattern (and it's super cheap!)  Just draw out a pumpkin shape in the size you want the finished purse to be.


I drew out the lines on the inside of the pumpkin and also the face on my pattern but only to get the right shape/size because I'm terrible at drawing freehand.  Nothing is actually used except the very outside edge of the pattern so no need to add them like I did.


Next, cut out 2 pumpkin shaped pieces from the orange felt as well as 2 from the interfacing.  Also cut a long rectangle from the orange felt in the size you would like the depth of the purse to be.  Ours was about 1.5 inches.  It needs to be long enough to go across the bottom and up the sides of the pumpkin shape but you can adjust this as you put it together if you aren't sure.


Now is also a good time to cut out a green stem and the black jack-o-lantern face or you can do it later if you aren't sure whether to add it or not.  I wasn't sure at this point in the project but it definitely adds a little Halloween fun!

Next, hot glue the interfacing to the orange felt pieces.  I suggest trimming the interfacing down just a tiny bit so that it doesn't go all the way to the edge of the orange.  It will make it easier to hide the white (which I didn't realize until I had already started. Learn from my mistakes!)


Next, hot glue the rectangle strip of orange felt to one pumpkin cutout.  Fold it under as you go so that no rough edges are showing.  Hot glue is very helpful for this because you really can just pinch and smooth it down as you need.  I started at the bottom and went up both sides so I could get a feel how high I wanted the edges to be. 

This is an example of how it will look after one side is finished.  You can see how the felt is folded to the inside around the curve.  The second photo below shows how it will look from the outside after this step.


As you can see, some of my white interfacing peeks out. It isn't very noticeable when the purse is being worn but I still wish I would have cut it down a shade and glued it orange to orange.


You're almost done already.  Crazy right? Now do the same thing to the other side of the purse with the second pumpkin shaped piece.


Lastly, add your trim or purse strap by hot gluing it to the inside of the finished purse.  My 2 year old picked out the mini pom pom ball fringe  (which I got last Christmas in the Target dollar bins!)  This trim looked fine without anything over it, but feel free to add a square of orange felt on the inside to finish off the edges of your trim.


All done!  How darling is this fun little purse?  My 2 year old loves it and my (almost) 5 year old has asked me to make him one too!  This would make a great little gift or a perfect addition to all those cute fall outfits.  Now... bring on that fall weather!


Don't forget to follow me on INSTAGRAM and subscribe to my e-mails!


Thursday, November 8, 2012

5 Christmas Crafts using Fabric (most no-sew!)

Great news ladies and gentlemen: I finally have a job!  Well, a job outside of doggie trainer/housekeeper/cook/blogger that is.  Yes, I added blogging into that- it takes more time than you would think (unless you blog, then you probably WOULD think so)!  To make things even better, I work at the happiest place on earth.  No, no- not the one in Florida, the one for sewers.  Yep, I now work at JoAnn Fabrics.  Now if only I could figure out a way to spend all my time at Hobby Lobby and Michaels too (and get paid for it!)  Now I am just dreaming...

That being said, I have now spent my first day of work surrounded by CUTE fabrics and crafts.  So instead of shopping, I logged onto pinterest to "ooh" and "ahh" all of the neat Christmas ideas.  I figure this way, I am not just buying up fabric for no reason (hey, we've all got bills to pay, right?)... even if I really want to.

Here are a few really cute projects that I found:
*All projects and photographs are NOT my own*


{1}


"Embroidered Fabric Christmas Tree" by Better Homes and Gardens

I just LOVE this tree. The colors, the shapes, the buttons; it is beautiful. I bet the same idea could even be
made with fabric glue if you didn't know how (or didn't want to) sew.


{2}


"Ruffle Tree Skirt" by Done Over Decor

Here is another example of a fabric craft than can be made without sewing...(really!) I can't get over how lovely this is and how easy it looks to make. I especially love that she used burlap- so pretty. I will definetly be making this one soon!


{3}


Sparkly Sparkles {Embroidery Hoop Decor} by Whatever

I like this not only because it looks crazy easy and can be in any design you desire, but because they look like ornaments! I might even add a little something to the top to make it look even more like that. I love how simple yet stunning these embroidery hoops are. Plus, what a good use for any scrap fabric!


{4}


"Winter Wonderland Pillow" by Better Homes and Gardens

This craft calls for basic knitting, crocheting and embroidering knowledge to complete- most which I do not possess. However, I thought the type of look could be achieved by using punch embroidery techniques. Not that I know how to do that either, but my mom is getting into it lately, so I bet she would help me! Or, simply make the trees from fabric. I don't think it would be quite as nice, but still probably pretty cute. Anything with buttons on it seems to grab my attention.


{5}


 "How to Make a Fabric Bow {tutorial}" by WhipperBerry

I think this is just fantastic. I LOVE gift wrapping and am always looking for ways to make packaging more unique and personal. Can you believe that bow is made from fabric? Besides the fact that you can make these however you want, they probably look a lot better than those cheap bows from the store. I am really excited to make these- what an awesome idea WhipperBerry!


{Your Turn}
Which fabric idea was your favorite? Do you have a winter craft that you would like to share? I would love to hear what you are up to and what you think of these ideas. Don't forget to check out these bloggers for even more ADORABLE craft ideas!

Did you see my post on how to make Personalized Dollar Store Gloves? If not, check it out. I show you how to make three different styles, which you can then turn around to make hundreds (if you want hundreds of gloves!) It's a fabric craft of my own that I just made and would love to share with you.

Happy Crafting,
Kelsie Ann


Thursday, October 25, 2012

DIY Hard Shell Travel Case

Happy Thursday!  I know I say this every week, but boy do the days fly by!  At least the weather is nice... or at least it is where I live.  Anywho- today I want to share with you a project I have been meaning to get working on for quite some time now.

Let me explain:  In high school and college, I spent a low enough amount of money that I could keep track of all my spending in my head and by frequently checking online.  Well, now that I am married, it is harder to keep track of all the money going in, going out, from his card, from mine- it's a lot!  My husband keeps track of expenses using a computer tool, but we have to keep receipts to enter them in manually.  So... for the first time in my life I have to save my receipts.

Thus far, I haven't been doing so well.  Because of that, I decided to take my own spin on the travel baby wipe cases and make myself something to hold receipts as soon as I get into the car.  Clever, right?  I (and my husband) are hoping it works.

{I love how "adult" it looks- no baby wipes here}

{How to Make it}
Gather your materials and a hot glue gun.  From start to finish this took me less than 20 minutes!

I wont go into too much detail, since this basic idea can be found on "how to decorate baby wipe cases" tutorials.  I will however; give you a few hints on things I learned along the way that might help.

First, cut 2 pieces of fabric slightly larger than the case front and back.  Proceed to glue them directly to the case.

This is where mine is different:  Most of the tutorials you see have a piece of ribbon running along the edge to hide the end of the fabric.  I did not want that look, so I made my fabric long enough to fold into the inside of the case.  Before doing this, make sure your fabric is thin enough that the case will close!

{I let the fabric pieces overlap where the front and back meet *just a little* so that no plastic could be seen}

Second,  Finish gluing down all of the edges.  After I had already glued mine on, I wished that I had given myself more fabric to work around the closure clasps.


Third,  Attach any ribbons, buttons or other embellishments that you desire.  As I have mentioned a time or two: I love lace!  So, that is what I used.  It is entirely up to you.


Finish it off by cutting any loose threads or in my case, actually cutting the fabric off of the clasps.  I tested to see that it would close (because of thickness) but did not check the clasp part- oops!  Oh well, it was an easy fix.


{That's it!}
Really.  Quick and easy and really cute (at least, I think so!)  I am using mine to hold receipts so that they don't get lost in my purse, the bag or my backseat but you can use it for anything!  For some really neat ideas check out a post from Tip Junkie.  She has 12 awesome ideas including my favorite, a travel earring case!  I guess these cases aren't just for babies anymore.

P.S.  Are you loving the fabric I used?  Check out this post to see another project I did using fabrics from the same set.  I can't get enough of them!

Happy Crafting,
Kelsie Ann

LINK LOVE!  Linked up to: Every Day is an Occasion

Monday, October 15, 2012

Stay Warm & Stay in Style

Happy Monday!  Is it just me or does anyone else feel like the weeks are flying by?  Can you believe that we are halfway through October already?  Although I am sort of a wuss when it comes to cold weather, I welcome the fall and winter with open arms!  I love everything about the crisp air, changing leaves and yes, in time... the snow.  It's all magnificent. 

What is just as exciting is finding cute "cold weather clothes" to sport during this time.  Today I am going to show you how to turn Dollar Store Gloves into stylish and affordable wear for the upcoming seasons.


{Classic Lace Gloves}
I am a sucker for the "classics":  Classic books, classic clothing, everything!  In my teenage years I bought a typewriter just because I loved the nostalgia of it so much.  The classic thing I think I love most?  Lace. (You should have seen my wedding dress!)  It is so delicate and beautiful that it makes whatever it touches look so... classy.

Materials:

Really, that's it.  Lightly glue the back of the lace pieces to the gloves, let dry and enjoy!


{Vintage Inspired Gloves}
You could have probably guessed this by now, but I love vintage buttons, broaches and pins!  My mom and I love going to garage sales, flea markets and the like to dig through piles of "junk" in order to find a few {real} vintage pieces.  We may have been known to buy sets of earrings just to take off the back and use them for something else. What's great is that now, vintage is IN!  That means that stores are selling pieces that look vintage but you can buy them in bulk. 

Materials:
 {I almost used pieces we had from an old pair of earrings until I found these buttons- aren't they just wonderful?  I love that shape}

How to do it:
{It should be a crime for this to be so easy}


{Red Nosed Reindeer Gloves}
I know I jumped straight to Christmas with this one, but you need to be prepared for wintertime too!  My favorite Christmas movies are It's a Wonderful Life and of course the 1964 Claymation Rudolph, The Red Nosed Reindeer.  So, instead of trying to make gloves with a tiny George Bailey on them, I opted for our favorite Red Nosed Reindeer.

Materials:
  {For the vinyl shape, I used "patterned baby deer" from the Silhouette store made by Alaa' K.  I removed the inside design for this craft}

How to do it:
 Simply follow iron-on instructions that came with your vinyl.  For the nose, I suggest gluing it down first (with fabric glue) and then stitching it on snugly.  That way, his nose wont fall off!


{Your Turn!}
I would love to see the designs that you came up with to keep warm and stay stylish this cold weather season.  And, as always I love to hear any feedback that you might have on my projects, the blog or anything!

Happy Crafting,
Kelsie Ann

Link Love!  Linked up to: Every Day is an Occasion and D.L Art

Saturday, July 21, 2012

Vamp up a Lamp

Hello again!  I am so sorry for the late absence on this blog.  I have made a vow to contribute my time to Cut, Craft, Create in a way that it deserves.  I'll start off slow, but hopefully will be creating daily posts in no time!

For my "comeback" post I decided to share with you a quick little fix I made to an adorable lamp shade.


I found this lamp shade at a garage sale for a quarter.  I absolutely LOVE the pattern, so dainty and girly... I had to have it!  It had some pet hair on it (simple fix- just clean it!) and a stain (easy fix as well!) but it also had a TEAR in the side...


I contemplated just turning it to the back and leaving it- after all, I would be the only one who knew. But, as you may very well know, it is hard for a crafter to leave such a simple job undone! So... I added some flowers.

I grabbed some spare fabric that I had and rolled it up loosely.  Then I twisted it into a simple rose shape.


You may sew it, glue it, heck safety pin it if you want- just as long as it stays rolled up. 

I also made a simple pointed "leaf" out of green fabric.  I may update this later with a more leafy shape, but for now this was perfect.  (I'll be honest, I was trying to get this all finished before supper)


I like the sort of imperfect look that the rough edges have, but I did cut off a few of the extra strings.

Lastly, I attached it to the lamp with a little hot glue.  A few dabs is all it takes...


... to fix a hole in a perfectly good lamp shade!

Now I can show this adorable lamp without fear that someone will see the big hole in the side!  The best part?  It took me less than 30 minutes from start to finish.  Quick, easy and cute- it's a triple threat!

Hope you enjoyed this post and will be coming back soon- I promise to have more crafts coming your way!

Sending my love,
Kelsie Ann

Monday, April 16, 2012

Baby Gifts for a Baby Boy (or Girl!)


Last weekend I went to a baby shower for an old friend of mine.  She is expecting a boy and this was my first attempt at making BOY stuff!  Given, both of the onesies that I made will work for either sex, but I considered it a personal accomplishment.  Not covering it in pink or putting frills on the butt took all the restraint I had.

I wanted to share my little adventure with you as I made these onesies.  This was the first time I had used the heat transfer vinyl and- let’s just say… learn from my mistakes.

Materials:
-Blank Onesies
-Heat Transfer Vinyl
-Silhouette
-Button

Let’s Begin:
For other projects, I have only needed to cut my design on the Silhouette as it appears.  So I did the same for the vinyl:


 I continued on my way, covering the design with the mesh ironing cloth that I use when I make heat transfer projects.


But wait,   isn’t this supposed to be stuck to the onesie?!


Go ahead, laugh.  I did. 


Apparently for the heat transfer vinyl, you need to reverse the image before cutting it out on the Silhouette!  (Don’t forget to print with the shiny side down since it will be flipped over on your project and so it attaches where it should)


Just in case, when I ironed I used the Teflon sheet that came with the vinyl instead of trying the mesh again (the last thing we need is a forwards “Cute” and a backwards “Cute” on it!  If you do not have this, I do not think it really matters, as long as there is something between the two.

Make sure that you iron the design with the clear cover facing up.
It is okay to move the iron in small circles but mostly just let the heat reach the image.  BUT BE CAREFUL- keeping it on too long will cause the image to melt and bubble around the edges.


After you iron, let the design cool.  Next, peel off the clear covering.  If you are unable to peel it off without the vinyl lifting with it, put it back and iron for a little longer.


 Finishing up…
I finished up the first shirt by adding on the rest of my words, then hand stitching a button to the front.  For the second shirt, I was done after I ironed on the vinyl.


          I LOVE how great these look and I got a few good laughs while trying to figure it out.

I hope you all enjoyed this post and had a few good laughs (after all, if we can't laugh at ourselves, what's the joy in messing up?)

Have YOU had any "oops" moments that made you laugh?  Share them with me, I'd love to hear them!

Monday, February 20, 2012

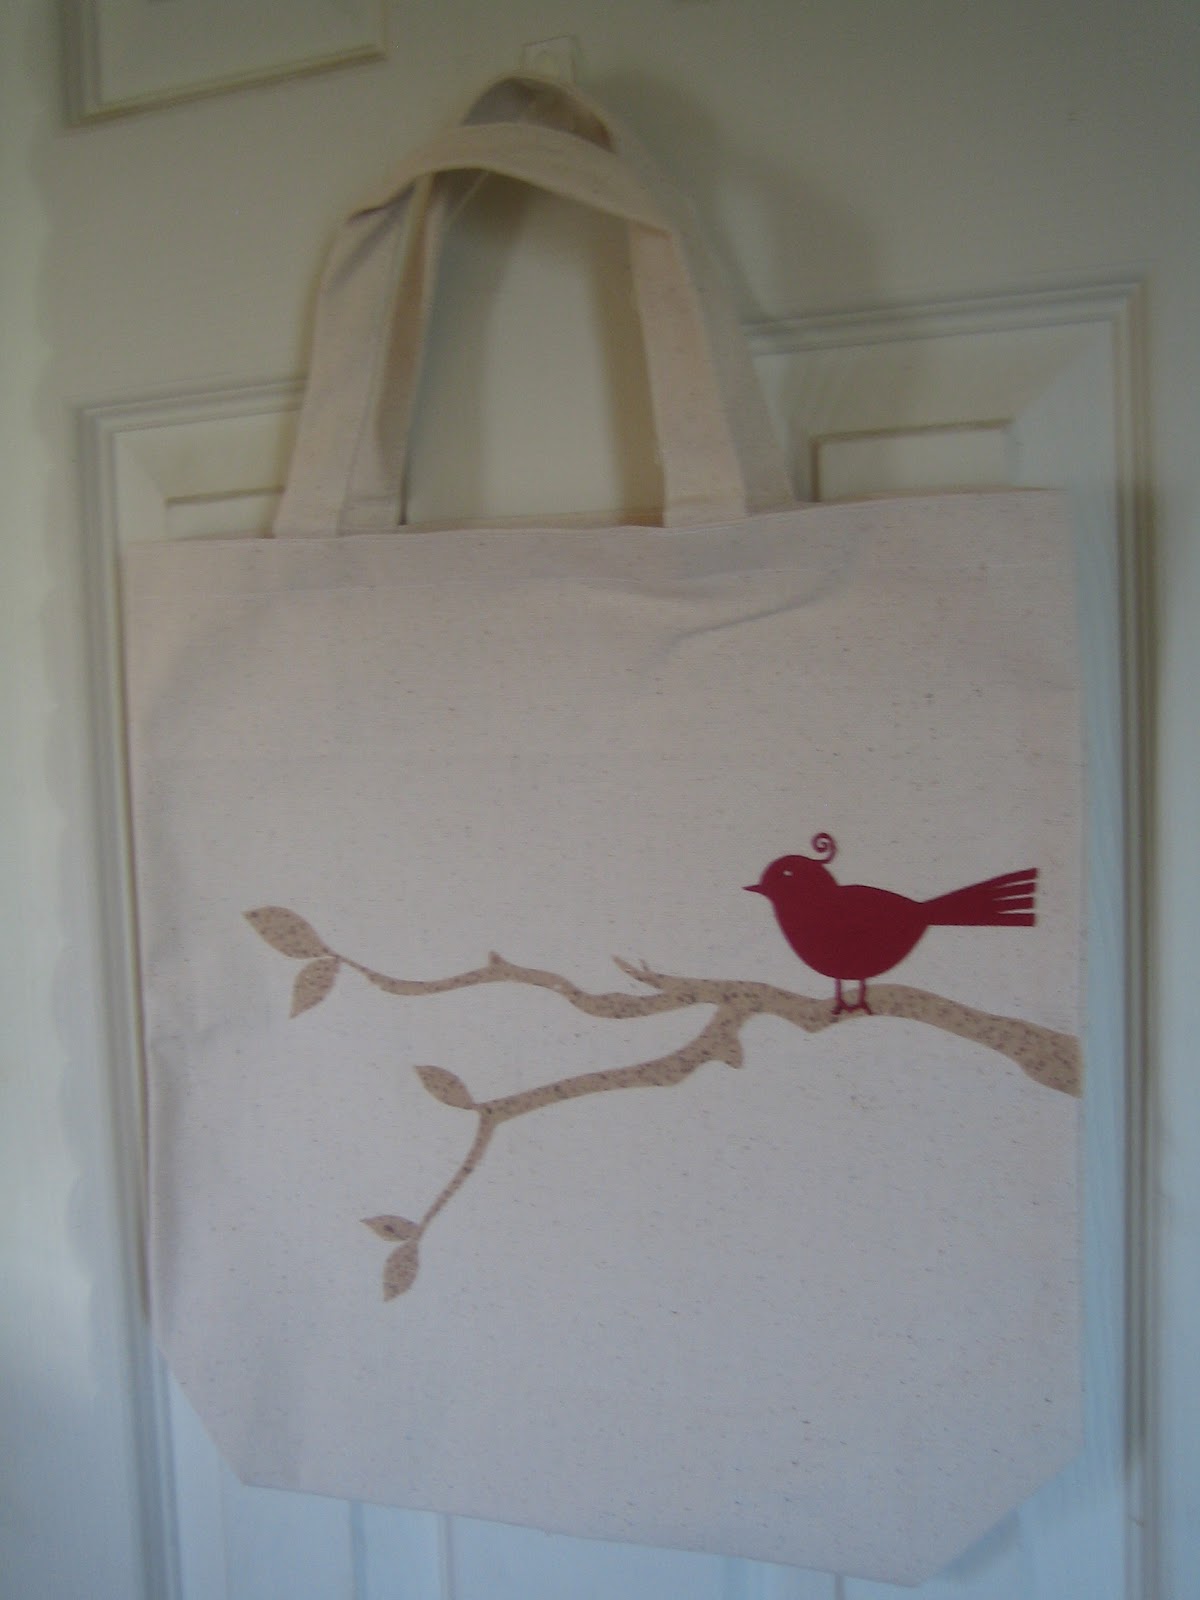
Tote-ally Cute Bird on Branch

Welcome crafters!  I am excited to debut my FIRST EVER blog post for you today.  As I pondered what craft would amaze enough to stand as the FIRST post I could hear the gears turn in my head.  Sticky vinyl?  Iron-on vinyl?  Magnet sheets?  Paper?  I decided on my oldest and dearest material: fabric.  My mama loves the new bird trend (who doesn’t?) so I figured I would make a cute tote bag for her.  No worries for those of you who are non-sewers, I’ll show you how to do a fabric iron-on.  Alright, are you ready?  Let’s make a tote-ally cute bird on branch tote bag! (Play on words are fun aren’t they?)

You will need:
-Fabric of your choice
-Heat n Bond (adhesive backing)
-Blank tote-bag

As well as an iron & ironing board, and of course, your SILHOUETTE!


STEP ONE:

Iron the  backing to the fabric by placing the glue side of the Heat n Bond to the wrong side of the fabric (side you do NOT want showing.) If you are only using a partial sheet you may cut it down before ironing to save materials.


STEP TWO:
Plan your design (choose from the Silhouette Store or make your own) and cut it out.
*If you do not own a Silhouette, cutting out a shape will work about the same.


We’re almost finished.  Don’t you love how quickly this goes?  


STEP THREE:

Set the pieces where you would like them positioned on your tote bag, peel off the paper backing and iron for about 10 seconds.  If you feel it needs a few more seconds, go ahead.


 My design was layered so my ironing was done in 2 steps.


Finished Product:


Voila!  Now I’ve got a finished tote bag for my mama that she can use to hold books, a beach towel or all that yarn for her new crocheting addiction!

Hope you enjoyed this post and have gotten excited to make your very own tote-ally cute tote bag!  Happy Crafting!