[Disclaimer: This post contains affiliate links to products I suggest using for this project. If you choose to purchase anything through these links, I earn a small commission at no extra charge to you. This helps me fund future blog posts, so thank you.]
{source: ReadyCartInstagram}
{source: Pinterest}
{source: Pinterest}
These are all amazing but right now, we like to focus a bit more on the creative process than having the house decorated with perfect pumpkins. (although as a mama, you know I think their pumpkins are perfect too!)
Here's what you'll need:
- Pumpkins for everyone (we used pie pumpkins for that medium size) You can also buy assorted packages of artificial pumpkins on Amazon if you'd like to keep them forever.
Here's what you'll need:
- Pumpkins for everyone (we used pie pumpkins for that medium size) You can also buy assorted packages of artificial pumpkins on Amazon if you'd like to keep them forever.
- Paint. Lots of paint. We use acrylic paint like it's going out of style in our house! I also found that my kids (especially 18 month old) really favored using the scribbles paint writers so that would be a good option for making fine-details or for little ones!
- Other small accessories like beads (those aren't the ones we used but I just found them and OMG animal shapes!), googly eyes, small strips and pieces of fabric and glitter. You may also add ribbon or trim around the stem if you'd like!
- Hot glue gun. (and adult supervision!) The heavier beads wont stick to the paint itself so you'll need to attach them with hot glue and have your littles point to where they want their bead.
- Hot glue gun. (and adult supervision!) The heavier beads wont stick to the paint itself so you'll need to attach them with hot glue and have your littles point to where they want their bead.
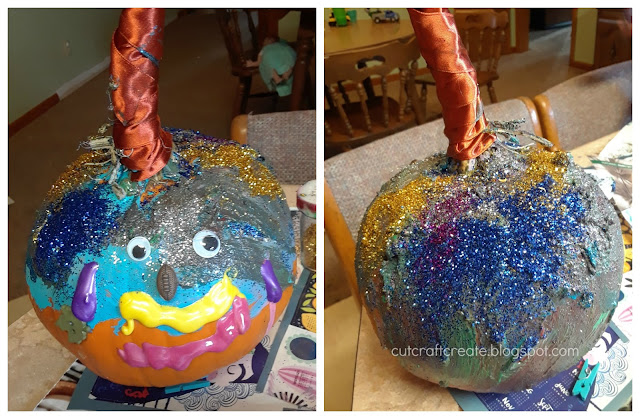
Spread everything out on a table (Don't forget to cover with newspaper or magazine pages!) and let the fun begin! My son had a blast with the glitter and writer pens (this isn't even what his finished pumpkin looked like. It's 3 layers deep!) and my daughter did a little pumpkin decorating and then moved onto decorating the magazine pages instead.
(It still dried in less than 24 hours! I couldn't believe it.)
(I also love how my son looks like he's doing a magic trick or is a fine culinary chef back there)
It's all about having fun so don't push them any direction and just let them explore the textures and give them the chance to practice their creativity. Today's world seems to struggle with letting kids do that sometimes.
Most importantly, have fun! We aren't trying to win any pinterest competitions here, we're trying to raise confident, capable children #amiright?
Oh... and maybe take off your rings before you start. I didn't even make a pumpkin but I got a lot of paint and glitter on my very special rings. Oops (don't worry, I got it all off!)
Here's a look at their finished pumpkins. My son made a man (the yellow is his mustache) with glitter hair and my daughter went for the more understated simple design. If that doesn't describe their personalities, I don't know what does! It's funny how things like that happen.
Can I let you in on a secret? The kids (especially my daughter) are SO PROUD of their pumpkins. Showing them off to everyone and pointing them out every time we walk past. Trust me... it's definitely worth the mess!


Those are cute pumpkins the kids make. I really have to learn how to let my kids make messes. We got plastic stick on face parts and they had fun just pushing it on the pumpkins. They love to go out daily to look at their wonderful pumpkins
ReplyDelete