Thursday, April 11, 2013

Free Printables and Facebook Covers

Hey all.  It is T-2 days until my cousin's baby shower that I am hosting for her.  I wish I had the whole week to work on it and it alone but you can't win them all right?  Because of this, I am focusing my attention on baby shower stuff only.  Yep, you guessed it: no Thursday post. 

I feel bad leaving you high and dry though so I whipped up a few printables to make your day shine a little brighter.  I don't know about you, but we were up at 1:20 this morning, waiting out a tornado warning.  A little sunshine and happy sure couldn't hurt us here.


This is a full sized piece that can be printed and hung for an easy way to brighter your day (I think I might put it in my craft room!)

Get it here.


Here's a matching facebook cover.  I like the simple nature of a few words written on a (mostly) solid background.


Get it here.


Okay, here is one more that I actually make for my personal facebook page the other day.  If you love Dr. Seuss or are passionate about anything, this is the cover for you:

Get it here.


{That's It}
Sorry to leave you hanging with no craft project, but I hope you enjoy some of these free printables/facebook cover photos.  Speaking of Facebook, if you haven't done so yet, please "like us" on facebook to get instant access to posts, photos, links and conversations.

One last thing...
Since I feel so darn bad for leaving you craft-less, how about next week (either Monday or Thursday) I do a GIVEAWAY?!  Sounds good right?  Make sure you don't miss it (another reason to like us on facebook!) and other crafty goodness too!

Happy Crafting,
Kelsie Ann

Monday, April 8, 2013

Frame Your Memories & Mementos

Let me start off by saying that I LOVE this project.  I haven't had the chance to hang it up yet but I seriously pick it up every time I walk past it.  Maybe I am crazy, maybe it's just that good.  You be the judge.

My husband and I got married last summer and like many people do, we saved his boutonniere (I took apart my bouquet but use the billy balls in decoration around the house) and let it dry.  There it sat, on top of a bookcase for around 10 months.  I wasn't sure what to do with it but I knew it wanted to keep it.  Then one day it hit me- frame it! 


Depending on the size of your memento, find a frame that will fit around it with room to spare (so it doesn't look too crowded).  I found the perfect sized frame but had to make a few changes to it.  I ripped off the backing, took out the staples and removed the mat and picture that was already in there- leaving only the glass and frame.  Check out Goodwill or the Salvation Army for some cheap frames that you don't mind altering a bit!


I used vinyl for the wording and hot glued the boutonniere on.  Easy peasy. 

{Because of the font, the silhouette made cut marks between some of the letters.  At first I thought I would re-do it but once it was up I loved the chipped look of it!}


A final look at the finished product:

{I love that it's see through.  No mat, no extras drawing the eye away from the good stuff.  Just lovely}


If you are wondering how I picked "our big adventure" here's the story:  I wont give away all the details of my husband's marriage proposal because that's our thing that only we know but I will say that it involved a theme of "our big adventure".  We were getting ready to hike the Grand Canyon (an adventure for sure) and we were looking ahead to our lives together (an even bigger adventure).  Putting these few beautiful words next to his boutonniere just seemed right.


{Your Turn}
What special memories and mementos would you frame? As soon as I get the tools to do it, I am hanging this beauty right in our living room where we can see it everyday. It is not just lovely to look at, but a constant reminder that we are in this big adventure together.


Happy Crafting,
Kelsie Ann

Tuesday, April 2, 2013

T-Shirt Makeover

Apparently I can not get my mind off of making clothes lately, because here I have gone and done it again.  Before you toss me into a "Making Clothes-aholics Anonymous" meeting allow me to explain myself.  During "I could make that!" March I had planned on making one of those workout shirts from an old t-shirt that you see all over pinterest.  That project seemed to slip through the cracks until the other day when a dear friend of mine (shout out to Geny!) sent me some pictures from when she tried it.  They turned out great... I had to try! So here is what I came up with:


I love the fit of this.  My husband bought a button up shirt recently and this plain white tee came with it.  He has specific white pocket tees that he buys (a story for another time), so he gave me this one to keep.  I like my shirts long, so when I cut the bottom of this shirt, I kept the front and back long and notched it up at the sides.


The sides were still a bit baggy, so instead of tying the straps together at the top, I tied them together farther down my back which pulled the sides in for a more fitted look.  Does that make sense?  Here, look at some pictures:

{I added a little blue heart to the strap to pull it all together... plus I just love hearts!}


Since the shirt was plain white, I added my own design to the front.


I chose "BE LOVE" because I wanted the emphasis to be not on the action, but on the noun.  Right now, people are arguing about politics, religion and the like.  We keep talking about what we need to BE DOING and I think we need to look at it as WHO we need to BE.  Let's set aside our differences and stop trying to find a solution that is out of strategy and instead find one that comes from inside.  People keep saying they want to be like Jesus.. well then, BE LOVE!  Maybe that is just me, but it's my shirt and I like it (I say in a matter of fact, crossed arm, childlike way)


To make this design, follow the same directions that were given in my "cheat version" screen printing post.  I used the bright yellow vinyl because I figured it was a color that I wont often use.  However, I've got to say... it does look kind of neat.  Is that the 80's coming out in me?


Thanks Geny for inspiring me to make my own!  I will fess up and say that I will probably not be working out in it (yes, it's true... I am skimpy on the exercise)  but it's so cute I could wear it anytime!


{Your Turn}
How many of you have tried this t-shirt cutting project?  If you haven't, I recommend it!  Check out pinterest for a slew of posts on how-to.  No pattern is needed and it takes minutes to make.  Don't forget to check out my "cheat version" screen printing post if you want to make your own design (it only takes minutes too!)

Happy Crafting,
Kelsie Ann
  

Monday, April 1, 2013

Vintage Wedding Tote Bag

This last week my husband took a group of kids down to Louisiana to build houses for Habitat for Humanity.  He does it every year and I am so proud of him.  This also means that I had a week at home, by myself.  My mom came over to visit and got snowed in for a few days, but other than that I cleaned!  Oh yes, spring cleaning has officially happened, plus spring organizing and spring finally-hanging-those-curtains-we-never-got-around-to-doing.  During my mad-woman cleaning spree I stumbled across an item of mine that is very dear to me- I wonder why I never shared it before:  my wedding tote.  Around two years ago, when I first got engaged, my mother made this tote for me so that I could keep all my binders, folders, papers, etc together in one spot.  It is beautiful...

{I should have emptied it before taking the picture, it is mighty full!}


Isn't that darling?  Our wedding was a rustic/vintage theme, so my mom was spot on with this vintage bride image.  She actually ordered the fabric piece online, cut it down to size and attached it to the bag.

{She knows me so well}


We added a small fabric flower to the corner of the image with a small flower button inside of it.


The border of the image was finished in this beautiful white trim.  Mom liked it because the little loops sort of look like hearts.  Perfect for wedding planning, don't you think?


She finished it off by adding our wedding date to a back pocket.


This adorable tote must have done it's job, because the wedding got planned and now I am married to my best friend.

{I wanted to add her website to the photo so that the picture wasn't taken without credit (please don't do that anyways).  See her website for more awesome photography}


{Your Turn}
Are you like me and just swoon over anything vintage looking? Did you (or someone you know) make something that was cute and helped you plan your wedding, shower or event? I love useful gifts and would love to see what you come up with so please share and comment below.


Happy Crafting,
Kelsie Ann

Thursday, March 28, 2013

Day Seven of "I could make that!" March {Guest Project}


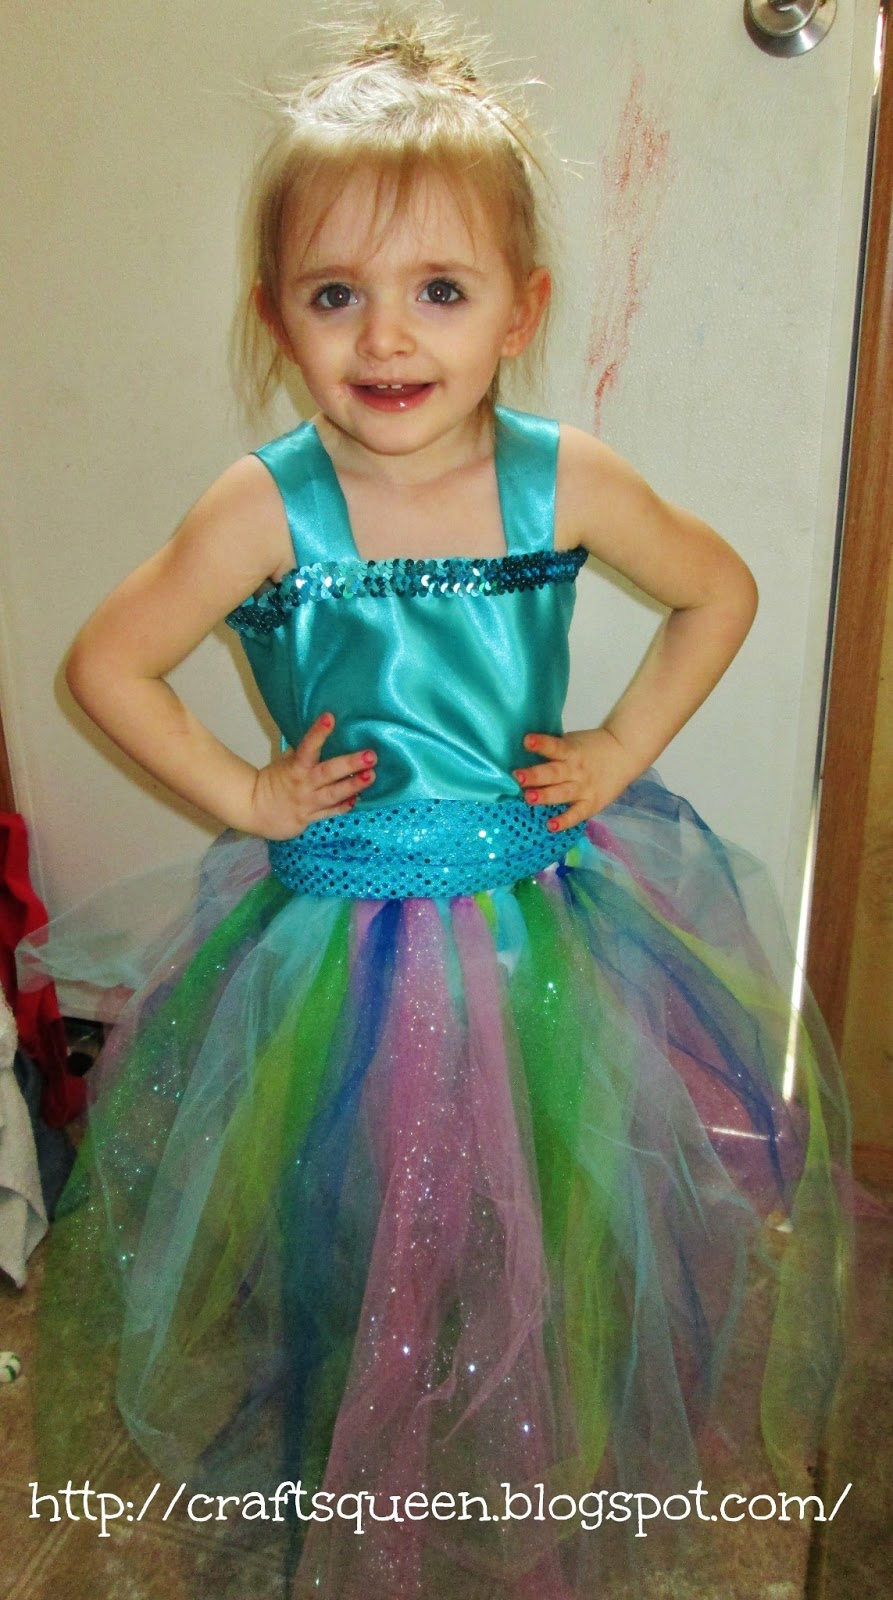
Today is the last day of "I could make that!" March and we've got a treat for you.  There is a young woman who I used to work with named Shana.  I never knew she liked to craft and I certainly never knew that she was a blogger!  One day at work we got on the topic and an instant craft bond was formed!  Recently, her daughter Rylie turned three, so this crafty mama got to work making a whole set of Disney Princess costumes for her!

The Little Mermaid

{A sneak preview of the cuteness- see her blog for more!}


I am so impressed by this outfit.  I love the colors, the sequined sash, everything!  It is so perfect for a mermaid costume and Rylie looks like a princess!

Shana tells how she came about wanting to make these outfits (hint: she thought to herself "I could make that!") and tells how to make them as well.  Check out the full post at her website The Queen of Crafts.  While you are there, follow her page and give her some blog love!

{Your Turn}

What did you think of "I could make that!" March? Did you play along? I really do want to hear about your projects so tell me about them or better yet, link them up in the comments. I would love to check them out.

Don't forget to visit Shana for the full project how-to and more!  And for heaven's sakes, give the girl some blog love...she deserves it after making all those dresses!

Happy Crafting,
Kelsie Ann


Sunday, March 24, 2013

Day Six of "I could make that" March!


It's Day Six of "I could make that!" March and today we have something even better than Cinderella's glass slipper- Newspaper Heels!


Of course, this idea was inspired by an image I pinned on Pinterest:

{via}

Apparently this idea came from Michaels (LOVE Michaels!).  I actually like the Superhero look a lot, but since I'm not much of a comic book reader, I thought it would be a bit of a lie for me to sport these amazing heels. 

However, if you've been following me for very long you know that I LOVE newspaper.  I've made newspaper mason jars, decorative glitter sticks, Easter eggs and more- all from newspaper!  So why would these heels be any different?


I bought those silver heels at Goodwill several years ago.  There are large clear beads attached at the toe, which I kept on the shoes.  Small strips of newspaper were cut and placed in between the beads.  Because the shoes were originally silver, any gaps in the paper are non visible from eye level.


Not bad, huh?


This could be pasted in several smaller pieces as well, I just chose to make the side strips long.  It's entirely up to you!

I didn't change a thing from the original instructions listed on the Michaels Pinterest image except for using newspaper.  Just cut, Mod Podge, stick and cover again with Mod Podge!  That's it!


{Your Turn!}
Forget about the glass slipper, you wont want to leave your newspaper heels behind!  Can you think of another material pattern to use (other than comic or newspaper)?  Anyone else willing to try this out?

Happy Crafting,
Kelsie Ann

Wednesday, March 20, 2013

Spring Blog Hop


Hello and welcome to our Spring Blog Hop!  If you're following along, you should have come from the talented Lisa at A Mermaid's Crafts.  If you are just joining us, head over to the beginning and visit Jill at Every Day is an Occasion.

Today I am sharing a piece of Springtime decor that I made for our fireplace mantel:

 
If you're thinking "wow, she has cement blocks behind her fireplace mantel?", I do not.  Because of the terrible lighting in the house, I attempted to take some good shots outside.  The bitter cold wind didn't help much (come on Indiana, it's SPRING now!) so I found refuge in the open spot behind the barn.  That being said, excuse the lighting in these pictures.

For the base, I cut a block of wood, painted it dark green and hot glued some homemade pom poms on top.  I used the "fork technique" (you can find dozens of tutorials on pinterest).  I tried to make it look like a field of green grass with some white and orange flowers popping up!  What do you think?


Then I added some skewers to hold up my pendant and used twine to string it across.  I am so into the pendants right now, I had to use them here!


It is finished off by setting a sweet bunny on top.  This little guy is actually part of a salt & pepper set that I bought at Cracker Barrel!  Darling, isn't he?

{My husband thinks it's strange that they made a "green" bunny.  I think he's adorable!}

Here's what it looks like against the brick on our mantel (see... bad lighting!)

 
{That's it!}
Sorry no blog candy today.  I just got back from vacation and it completely slipped my mind!  Next time I will make it extra good- deal?

If you enjoyed your stay, don't forget to Follow Us on Facebook and join our page!  As always, your comments are more than appreciated- whether you have something to say or just want to say "hi", we love to hear from you!

Thanks so much for stopping by!  Your next stop is the insanely creative Missy from Quick Chick Designs.

In case you get lost, here is the line-up:

Kelsie Ann- Cut Craft Create
Heather- The Hunny Pot
Shelly- My Paper Love
Jamie- So Much Better With Age

Happy Crafting,
Kelsie Ann