Showing posts with label Ribbon. Show all posts

Saturday, February 22, 2014

Decorate Your Office Space {Part 1}

Remember the days of decorating your locker?  I wish I could find an old picture of mine- covered in pretty papers, magnets and don't forget... pictures.  I've always been a big fan of pictures.  Just because I am an adult now, doesn't mean that I don't still want to "decorate my locker" so to speak.  That's why I want to share with you a little work-space inspiration...


This "Decorate Your Office Space" post will be featured in two parts.  Today is the desk (drawers and computer) and next week will be the walls!  Next week may include some freebies, so don't forget to check back!

I love my job.  I love what I do and I love my co-workers.  I don't however, love the boring space! I've been meaning to dress up my space for a few months now and just haven't gotten around to it.  Once I put my mind to it, this overhaul took no time at all!


Sure the desk serves a purpose, but who doesn't love a little color?  What about those drab walls?  Yes, there are some flowers up on the wall but there is nothing personal about it (they will probably come down).  See those fuzzy slippers under the desk?  Those aren't part of the overhaul, they are just a good thing to have if you don't wear boots in the wintertime and your feet are cold under the desk!  The day I brought those in, my co-workers asked if I was "moving in"!

Here's what I did:

Materials:
-Wrapping Paper
-Tape & Scissors
-Glittery Ribbon
-Scrapbook embellishments (optional)

For the desk drawers:

STEP ONE:  Cut the wrapping paper to just larger than the desk drawer.  The paper will need to wrap around to the back of the drawer front.


When you open a finished drawer, the paper should wrap around, as seen above.


STEP TWO:  Holding the paper up to the drawer, draw a line where the handles (or other holes) are.  Cut these spaces out and slide your large cut piece back over the drawer.


Try to cut the hole as close as possible so that none of the wood or metal shows through.


STEP THREE:  Tape the paper onto the desk drawer!  Wrapping paper is thin enough that regular scotch tape works fine.  I taped the top, then each side and then the bottom, making sure that it laid flat as I went.

STEP FOUR:  Fill in the empty spaces.  Some holes (like the ones for the handles) will create a bare spot.  Simply fill this by cutting a rectangle to fit and taping it in.


On the printed paper, the tape doesn't show up unless someone is inspecting it.

The solid paper however, shows the tape much easier.  For the most obvious tape spots, I simply attached a scrapbook embellishment to cover it up.  Looking back, I would have used all prints or attached the paper with some double sided tape instead.


STEP FIVE: Finish off the desk drawers by adding any other embellishments that you like.  I LOVE Heidi Grace Designs, she is seriously the BEST scrapbook embellishment designer (they have fabric too!) I've ever seen.  I have a lot of her stuff.  All the embellishments seen here are from an old collection of hers (honestly, these pieces are my least favorite in the collection and still cute!).  The rest of the collection features her signature "heart" and tons of "wood" pieces- perfect for my rustic wedding scrapbook!  Anyways... add them where you like.


That's it!  The computer is even easier.


STEP ONE: Cut the glittery ribbon to just larger than the length (and/or width) of the computer screen.

STEP TWO:  Add tape to each end.

STEP THREE:  Tape the ends around the back of the computer, making sure that the ribbon lies flat against the edges of the computer.


Seriously, it's that easy.  Who knew such a big update could be done this quickly?

Want to see something unexpectedly fun?  As I was taping the flower print onto a desk drawer, I looked up and saw that my Tervis cup (I'm addicted to these!) had the EXACT. SAME. PRINT.  Really.  The colors, the flowers and everything.  If I held the cup "just right the lid actually matched up with the solid color on the other desk drawers.


I guess the person who bought me this cup really knows my style well!


I am loving this new fun desk!  If you are still in school, you can use the same technique to decorate your locker as well!


Since everything is taped, it is easy to take down and causes no damage to the company's property.  I hope this inspired a few of you to "Dress Up Your Desk"!

Happy Crafting,
Kelsie Ann

Monday, May 6, 2013

Mother's Day Wreath made of Craft Supplies!

Mother's Day is quickly approaching and I have been racking my brain trying to think of something really special to give my mom this year.  See, the problem is:  the woman doesn't like gifts.  Not to say that she doesn't appreciate them, she just doesn't need a lot and so would rather have dinner with me than the best gift in the world (although she does like her Kindle Fire that I got her!)  I would rather spend the time with her too but I also wanted to give her a little something to make this day different from every other Tuesday when we have our lunch dates.

So what do you get the woman who has everything?  More craft supplies of course!  The staple craft supplies are always in high demand, so why not get a few more?


Did I mention to put them on a wreath? 

Floral wreaths are lovely but a wreath full of craft supplies is the best!  Here's how to make it:

Step One: Buy a Styrofoam wreath at the craft store.  Paint it with acrylic paint.


Step Two:  Attach ribbon, fabric, beads, glue sticks, and more!  Yep.  That's it.  Two steps.


If you want your mother to be able to actually use the pieces, only add a dab of glue to the very ends of the ribbon.

For the fabric, simply roll it into a flower-like shape and PIN down.  This way she can unroll it and use it- glue free!


I chose to keep the ribbon on the spool (just for looks) and made a hanging loop from it.


To keep the acrylic paint from falling off, apply a line of glue down it's backside and stick to the wreath.


For some reason or another I haven't quite jumped aboard the "washi tape train" yet.  However, look at this beautiful print!  I thought mom would love to give this a try.


Each piece is glued, pinned or (in the washi tape's case) laying carefully upon the wreath but should be able to easily be taken off and used later.  Small purple jewelry beads were taken apart and glued around the wreath for decoration.  The great thing about hot glue is that it comes right off of stuff like this!


I'm going to try to run over to mom's house and give this to her early before she reads this post!  No amount of craft items can express my gratitude to my mother.  She's always been there for me and not only has she been a stellar mom but she has truly been my best friend.  I couldn't imagine going a day without talking to her or a season of my life without her.  I am who I am because of my mother.  I love you mom!


Happy Crafting,
Kelsie Ann

Thursday, September 6, 2012

Mason Jars + Paint = Cute, Cute, Cute!

First things first- I want to apologize for not posting Monday.  In a perfect world I would like to post every Monday and Thursday but sometimes (like this week) that just can't happen.  I am sure none of you noticed, but for future reference that is what I am trying to do.  That being said, expect my next one on Monday.  Aaaanywho...

I have said it before and I will say it again- I have got a LOT of mason jars lying around this house.  I want to start making those "sand art" food mixes and giving them to people, but I seem to be behind on that as well.  Until then, I am using the jars for my own selfish purposes.

Here is what I did today:


All it takes is some paint and an empty jar.  Really... it is that easy.

Flower Jar

I sponged pink paint onto the front of the jar, let it dry, then with a lighter touch- sponged some green paint over it.  These colors don't actually match my kitchen (which is where it sits) but I love how it looks with those blooms sticking out of it!

{I love the way it sits in one corner of the window and sort of reaches to the other side}

{These "blooms" are actually from some sort of wild flower that grows at our house.  I know it is probably considered a "weed" but I just think they are so pretty, especially when arranged like this}

Black & Gold School Mug

Okay, okay.  I was actually intending to make a Halloween jar but my "orange" paint came out looking a little more golden.  Nonetheless, my family LOVES Purdue football (and basketball and everything) and so this became my little "Purdue" jar.

This one was easy and fun to make.  All I did was squirt paint onto the edge of the jar and let it drip down.  Then, when it got to the bottom I swirled it around so that it would mix along the bottom edge.


I thought this jar would be a really cute gift container for a friend that goes to Purdue.  A football jersey fits inside it perfectly:


Then, when they are done with it, they can use the jar to store all those fun "school supplies" on their desk!


So easy but totally cute, right?  
These jars are easy to make and take no time at all (it actually takes longer for the paint to dry than to apply the paint)!  

Would you make these jars for a friend (or yourself!)?  What school colors would you do them in?  {P.S. Although my family loves Purdue, it needs to be said that black & gold were MY school colors too at Manchester College- go Spartans!}  

With Love,
Kelsie Ann

Link Love! This project is linked up to: Every Day is an Occasion

Friday, August 31, 2012

Treat Container From an Old Coffee Can

Woof, woof!  That's hello in "dog"... I think.  How many of you are pet owners or know someone who is?  The likelihood of one of those statements being true is pretty high.  As a matter of fact, statistics from the humanesociety.org say that thirty-nine percent of households own at least one dog and that thirty-three percent own at least one cat.  These statistics are just in the United States alone!

For those of you who own a dog, cat, ferret, gerbil, even a snake or just want to make something cute for a pet-loving friend, this post is for you.


First, want to see my little guy?  He is a 9 month old Rottweiler mix:

{His name is Ernie and don't let that sweet face fool you, he is ornery!}


That's why we have him (and us) enrolled in a dog training class.  Because this small container travels with us to class, I thought it would be nice to dress it up a little.

  {Every animal has some sort of treat or at the very least food!  Why not store it in a totally cute container?}


Check out the top:
 {It is even personalized just for Ernie.  I don't think it will stop the other dogs from trying to steal a treat, but hey I like it!}


Backside:
 {Want to know a little secret?  I only added this part because my paper did not reach all the way around the container.  Shhh don't tell!}


It is easy to make! 
All I used was some paper, ribbon, glue, beads and my Silhouette cutting machine!  How great is that?  I also finished it off by covering it with mod podge to help secure the pieces and to give it a crisper look. 
 

Before Mod Podge                                                                                   After Mod Podge


Your turn!
Have you made any crafts for your pet?  If so, what were they? I would love to hear about them, so comment or link up your projects to this post.

In a few weeks I will be posting homemade dog treats as a gift to all the dogs who went through the class with us, so keep watching the blog for that!

With Love,
Kelsie Ann


Link Love! This project is linked up to: Every Day is an Occasion.com

Tuesday, July 31, 2012

Fabric Luggage Tag Tutorial

I love to travel.  Seeing new places and relaxing with loved ones is about as perfect as life can get.  Very soon, I get to visit ALASKA for the first time ever!  I am trying to keep myself busy so that I don't spend all day every day reading about random Alaska facts (I'll let my husband continue to be that guy).

So what do I do instead?  Make crafts that relate to my traveling!  Today I made a luggage tag for my brand new suitcase.


This suitcase technically has a spot for this but it's inside of the zipper area, so that's no help when I'm trying to figure out which bag is mine. {because there are SO many bright green suitcases out there!}


I searched the internet for ideas on how to construct this tag, but found nothing that I loved. Finally, I decided to just make my own using my husband's luggage tag as a guide.


I wanted the sort of "double layered" look and for the clear plastic to be entirely on the inside. The only part I left out was the flap that covers it.

How I made it:

{1} I cut out 2 rectangles in the size that I wanted the end product to be (allowing extra for my seam) and sewed it on three sides. Don't forget: When you sew, right sides together!


{2} Cut a piece of cardboard (I just cut up an old box from some jelly mason jars) that fits inside the opening. Flip your fabric, so that right sides are out and slide the cardboard into the fabric.


{3} Make a strap either by cutting a long strip of material, folding it in half longways and sewing it. (Again, right sides together when you sew, then pull it through the opening to reverse it.) or by adding a piece of ribbon, leather or other strap material.

{4} At the opening, fold in the fabric as it would be if you had sewn it and slide the strap into the center. Sew along the edge to close it up and to keep the strap from moving.


{5} For the top piece, cut 2 rectangles in the same size as you did the bottom pieces. Then cut an "X" in each piece (make sure they line up with each other). This will make a finished edge to the area where your information is written.

                                                      {I made the hole roughly the size of a business card}


{6} To give the front some stability, I suggest ironing some interfacing to the wrong side of the fabric.  At this time, also iron down the triangle pieces from the "X" and trimming them if need be.


{7} Sew the top 2 pieces together (leaving the same side open as the bottom).

{8} Cut a piece of clear plastic into a rectangle slightly bigger than the hole. I used one of those clear scrapbook covers. You may also use those clear bags that sheet sets come in or another similar material.

{9} Lay the entire thing over the bottom piece, lining the edges up. Hold the plastic in place or pin it (just make sure not to pin through the center, the pin hole wont go away!) and sew a top stitch through all layers.

*DON'T sew across the opening (the side where the strap is) or else you won't be able to slip a card in and out!

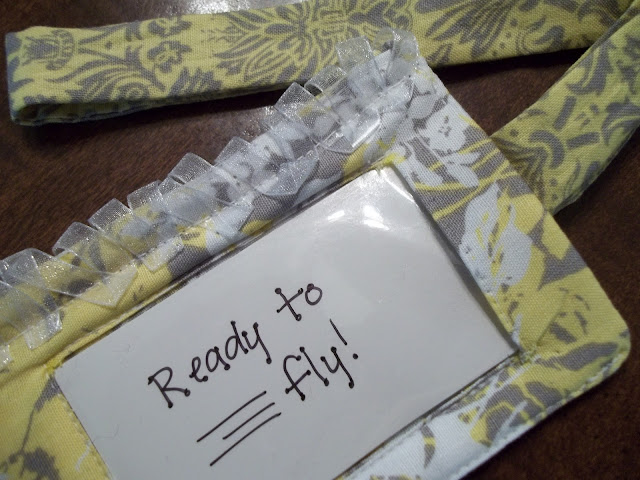
               {I also took some sheer ribbon and made a "frill" across the top side, stitching straight across}


                                        {The card slides in from the right side easily yet stays snug inside}


Love the colors; Love the design, Love the frills!

I can't wait to see all the places that this luggage tag will go with me. Alaska here we come!

Your Turn!

Would you add the "frills" to the top? What kind of fabric would you use? Show me your designs and let me know what you think!

With Love,
Kelsie Ann


{Linking this project to: Jaihart- Sundays Are Lovely #11 }