Showing posts with label Tutorial. Show all posts

Tuesday, October 4, 2016

Personalized "Paper" Dress-Up Doll


Show of hands- who played with paper dolls when they were younger?  I loved paper dolls.  As I have grown, my love for them hasn't quite disappeared and I use any opportunity I can to make or play with them again.  When I worked as a traveling social worker, I purchased a set of magnetic dress up dolls (at the dollar store!) for my 'kids' to play with in the car.  You might also remember a post from 2014 where I created felt dress up dolls for a little girl I know who was going through cancer treatments.


See the details and get the tutorial for the felt dress up doll HERE.


I had almost forgotten about another dress up doll I made until my 2 year old son found it and has been obsessed every since.  It's seriously his new favorite thing to play and I think it makes it extra fun for him that the "doll" is actually his mommy!


I made this Velcro "paper" (photo) doll back in 2006 for my Consumer Clothing notebook as part of one of my 4-H projects.  I wanted to demonstrate the different ways my consumer clothing outfit could be worn with other articles of clothing that I owned.  This idea was very popular in the project in our county and state level and apparently has also won over the heart of my toddler.


What makes this project so special is that your child (or students, or whoever!) can dress up mommy or daddy, grandma, friends or even themselves!  It is also very inexpensive to make and would make for an awesome personalized gift that they are sure to treasure.


Here's how you make it:

Step 1: Pick out several outfits that include a shirt, pants/skirts and shoes.  Include some dresses, hats or other accessories for extra fun!

Step 2: Set up a timed camera or have someone else take photos of you in each outfit.  Make sure you are standing in the exact same spot and position for each photo.  It doesn't matter that your pieces match in the photos because you will be cutting them apart anyways.


Step 3: Take 1 photo of yourself in a swimsuit.  I mean, you could take one nude but I'm not sure you want that floating around as your kid plays with it!  haha This will serve as the "bare model" that can be dressed in different outfits.  You could also use other pieces of clothing as long as it wouldn't "stick out" past any of the outfits that are being dressed on top of it.


{I must really love sharing my crafts with you or I would never post this photo on the world wide web! Eek!}


Step 4: Print your photos and carefully cut around each piece of clothing. [My favorite places to print photos are Shutterfly.com or if you need them quickly, your local CVS.]

*Feel free to check out a list of my favorite crafting resources here*


Step 5 (Optional): Glue the doll to a scrapbook paper, board or whatever you want as your background piece.  If you wish to keep the doll loose that should be fine too.


Step 6: Attach sticky Velcro dots to the back of each article of clothing (you may have to cut them down for the shoes or other small accessories) and to the front of your doll.  If you are using a board/paper background, include Velcro pieces to hold all the items of clothing. Make sure you use the different "sides" of Velcro so that the clothing sticks to the doll/background.


{You can see how I used the Velcro dots behind the shoes.  Ignore the missing white flip flop and pen marks.  That's what happens when you give it to a toddler!}


{He loves it!}


That's it!  
Get as creative as you want with the board design and with how many outfit options you have.  I think it would be fun to even have other scenery like your pet, or household items that can be used to "decorate" the room/back board.  Go crazy and get creative!

Saturday, January 25, 2014

DIY Cell Phone Case Tutorial {to fit any phone!}

Raise your hand if like myself, you have cracked the screen on your phone.  Okay, put your hands down.  Now, how many of you cracked your screen because you did not have a case on your phone to protect it?  Yep... that's me too.  I don't know about you, but I put off buying a case because I could not commit to a design.  I wanted to find one that I loved or, buy a dozen of them so I could change my mind!  We can change our clothes, our shoes, even our accessories... why not our phone cases?

I also have a smart phone that is not an "i-phone" which makes the case selection much smaller.  I have an HTC first, but with this tutorial you will be able to make a case for ANY phone that you have!


These are super easy to make and take minutes per case.  It took me longer to pick out the paper (really!)

Materials:
- Scrapbook paper (thin paper works best, textured is too thick)
- Clear phone case (I got mine for a few bucks here on Amazon- HTC first)
- Pencil
- Scissors

STEP 1: Pick out your paper.


Repeated prints work best.  I chose some designs with a more neutral pallet, others with bright colors.  It's entirely up to you.  I would like to have found one with large flowers (that take up the whole case) but apparently I need to buy more paper for that (my husband commented that I don't need more paper!)

STEP 2: Trace around the case backing.


When I first started, I also traced around the camera hole in the back (as you can see above).  However, after cutting it out, I found that it is better to wait on this part so that the holes line up.  Right now, just trace the outside of the case.  Don't forget to trace into the outside "holes" (like your power, volume, etc buttons)

 {It's important to trace and cut around the notches so that there is not paper in the way of your buttons and plug ins... plus it looks so finished this way!}

STEP 3: Cut it out.


STEP 4: Press it into the back piece of the clear case.  Try to center it as best you can and line up the notches on the paper with the notches on the case.  The paper should fill most of the case.  This is why the thick paper (like the brown pictured above) does not work for it takes up too much space for the case to latch together.


{The paper should reach about halfway on the phone}

Doing this gives the paper a rounded shape so that the design curves around the phone (instead of just laying flat on the back)


STEP 5: Slide your phone into the case so it is snug, then trace the camera hole.


I found that it was best to do this step with the phone in the case so that the hole lines up.  Trust me, it is much more precise this way.

STEP 6: Pop the paper back out, cut out the camera hole that you just traced.

That's it!  Easy peasy and super quick!  I made several "cases" so that I can change them out when I am "feeling" something new.


Here are my designs...

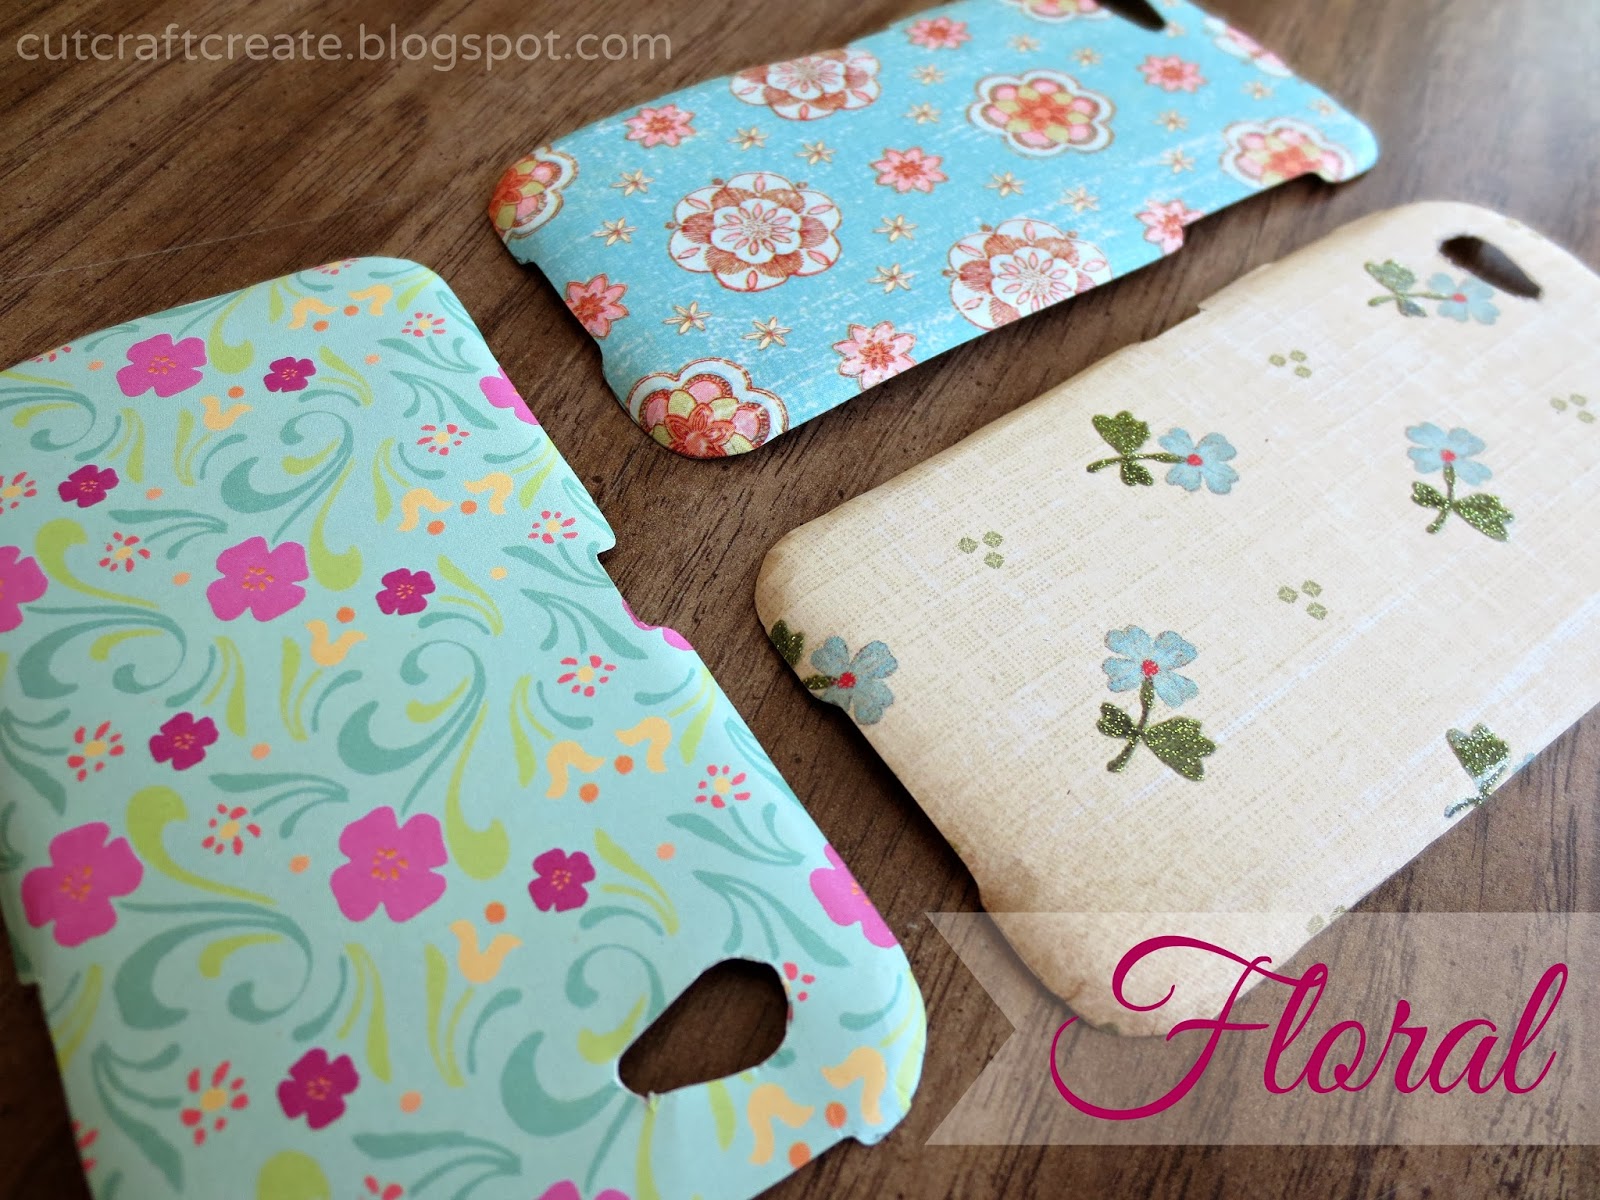
Floral:

{I didn't think I would like the blue with pink flowers but it's one of my favorites!}

Text & Collage

{I have a LOT of these papers, they are my favorite for scrapbooking!}

Color Sets:

{These came together in a pack and I love the colors so much I made three cases!}

You can also include additional pieces by placing them inside the case before inserting the paper.  Instant (and non permanent) change!  If you love it, glue it on the paper and keep it that way.


I would also recommend picking papers that match the color of your phone, since the base color will show through in the "holes" and on the front.  My phone is a pale blue, so I picked designs with blue in them.

{Sorry about the "selfie" in the phone reflection!  See the cracked screen I was talking about?}

Hope you have enjoyed this tutorial and I apologize for the crazy amount of pictures!  If I get enough comments (here or on facebook) I will create phone cover printables in a variety of designs and post them next week.  Let me know what kind of design you would like to have!


Happy Crafting,
Kelsie Ann

Monday, November 12, 2012

Glitter & Frost Snowman Decor {Tutorial}

I love wintertime.  I hate the cold- but I love wintertime.  It is all the magic in the air and the snow falling gently to the ground.  It is being snuggled up in warm scarves and cozy blankets.  It is building snowmen.  In the spirit of this beautiful season, I wanted to get an early start on that whole "building snowmen" part of it.  So, here is what I came up with:


I actually came up with this idea after we had frost one night.  Our patio furniture was still out and the glass top table was covered in frost.  As I walked past it, I drew a picture with my nail (we're really all children inside, aren't we?) cutting away the frost on top.  What I found was so neat:  the sparkling frost that covered the bottom of the table was showing through my design, creating this dimensional look that you see here.  That look was just beautiful and easy to recreate too; let me show you how:


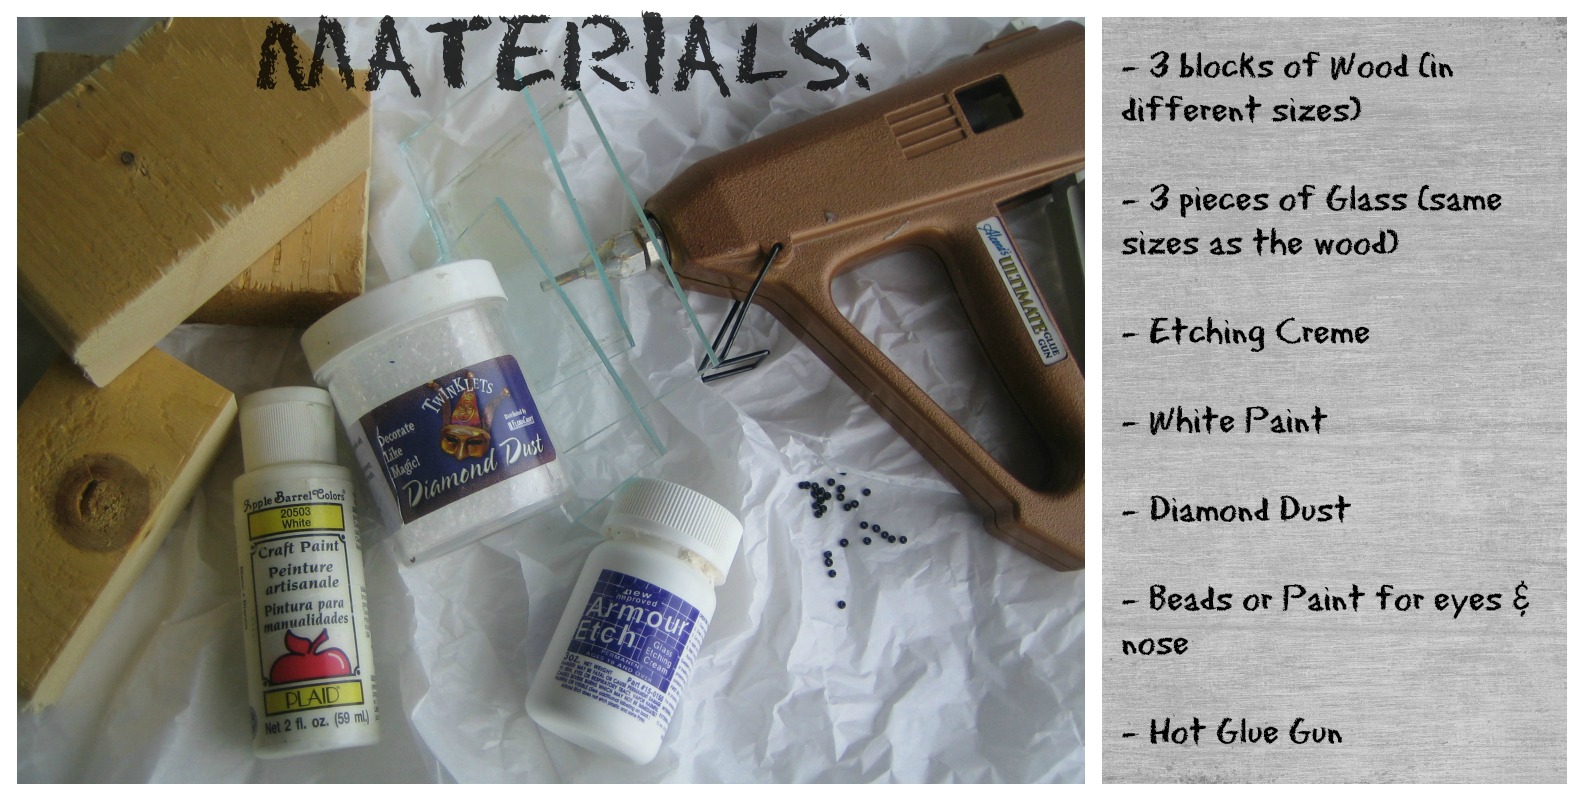
{What You Will Need}

Gather the materials listed above as well your vinyl pieces (3 circles to fit these blocks).  For the wood/glass pieces, I used the sizing as follows:
(Bottom) 3.5 inches wide x 2.5 inches tall
(Middle) 3.5 inches wide x 2 inches tall
(Top) 3.5 inches wide x 1.6 inches tall

If you will be cutting the wood and glass yourself, you will also need a saw and a glass cutter.  If not, your local glass store would be happy to make a few small pieces for you OR check your local craft store for pre-made sizes.


{Step One: Paint & Etch}

Paint each block with a couple coats of white paint.  Since it takes a few minutes to dry, paint one side and move onto the etching.

For the etching, place your vinyl in the center of each matching piece of glass.  Make sure that the edges form a tight seal.  Then, apply a generous amount of etching creme to the rest of the surface.  Follow instructions on your bottle.  {Hint:  I always keep the etching creme on much longer than it says.  15 minutes or so wont hurt it!}

Finish this step by painting the remaining sides of the blocks and (after the proper time has elapsed) cleaning off the etching creme.


{Step Two:  Applying the Glitter}
Add one more thin coat of paint to the front of the wood blocks. While the paint is still wet, sprinkle diamond dust over the top. While it dries, lightly press them in once or twice.


{Step Three:  Face Details}
Use whatever you desire to create the snowman's face.  I was going to use seed beads, but was having trouble getting them to stay on the glass.  I am happy with the paint though, because I could make the black parts look more misshapen like rocks or coal.


{Step Four:  Attach the Pieces Together}
Using the glue gun, make four blobs of glue on each corner of the glass. Quickly attach to the wood, pressing lightly. This will allow the pieces to attach together as well as create a spacer between the two (which gives it that dimensional look). Continue this process with all three pieces.


{Your Turn}
Any other designs you would make using this technique?  Have you made any winter crafts using etching creme before?  It seems like the perfect "frost" to me!  As always, I would love to hear your feedback or any input on future crafts you would like to see.

Happy Crafting,
Kelsie Ann

P.S. As I was writing this post, it started snowing here!  Too perfect!

LINK LOVE!  Linked up to: Every Day is an Occasion and Chick-n-Scrap

Monday, October 15, 2012

Stay Warm & Stay in Style

Happy Monday!  Is it just me or does anyone else feel like the weeks are flying by?  Can you believe that we are halfway through October already?  Although I am sort of a wuss when it comes to cold weather, I welcome the fall and winter with open arms!  I love everything about the crisp air, changing leaves and yes, in time... the snow.  It's all magnificent. 

What is just as exciting is finding cute "cold weather clothes" to sport during this time.  Today I am going to show you how to turn Dollar Store Gloves into stylish and affordable wear for the upcoming seasons.


{Classic Lace Gloves}
I am a sucker for the "classics":  Classic books, classic clothing, everything!  In my teenage years I bought a typewriter just because I loved the nostalgia of it so much.  The classic thing I think I love most?  Lace. (You should have seen my wedding dress!)  It is so delicate and beautiful that it makes whatever it touches look so... classy.

Materials:

Really, that's it.  Lightly glue the back of the lace pieces to the gloves, let dry and enjoy!


{Vintage Inspired Gloves}
You could have probably guessed this by now, but I love vintage buttons, broaches and pins!  My mom and I love going to garage sales, flea markets and the like to dig through piles of "junk" in order to find a few {real} vintage pieces.  We may have been known to buy sets of earrings just to take off the back and use them for something else. What's great is that now, vintage is IN!  That means that stores are selling pieces that look vintage but you can buy them in bulk. 

Materials:
 {I almost used pieces we had from an old pair of earrings until I found these buttons- aren't they just wonderful?  I love that shape}

How to do it:
{It should be a crime for this to be so easy}


{Red Nosed Reindeer Gloves}
I know I jumped straight to Christmas with this one, but you need to be prepared for wintertime too!  My favorite Christmas movies are It's a Wonderful Life and of course the 1964 Claymation Rudolph, The Red Nosed Reindeer.  So, instead of trying to make gloves with a tiny George Bailey on them, I opted for our favorite Red Nosed Reindeer.

Materials:
  {For the vinyl shape, I used "patterned baby deer" from the Silhouette store made by Alaa' K.  I removed the inside design for this craft}

How to do it:
 Simply follow iron-on instructions that came with your vinyl.  For the nose, I suggest gluing it down first (with fabric glue) and then stitching it on snugly.  That way, his nose wont fall off!


{Your Turn!}
I would love to see the designs that you came up with to keep warm and stay stylish this cold weather season.  And, as always I love to hear any feedback that you might have on my projects, the blog or anything!

Happy Crafting,
Kelsie Ann

Link Love!  Linked up to: Every Day is an Occasion and D.L Art

Sunday, August 26, 2012

Fun With Flowers {Congratulations Cards}

Oh, it is that time of year... flowers bloom, a soft breeze blows through the trees and yes, people get married.  I love this season.  I would attend every wedding that I passed- whether I knew the couple or not- if I didn't think I would be dubbed the "crazy lady" in town.  Really, I don't need food and I will bring my own chair; I would be no bother at all.  I would be happy just to experience this occasion.

This summer of love has been especially dear to me.  My husband and I tied the knot in June and since then we have had two separate friends get engaged!  How exciting this summer has been!  In the spirit of the season I have made a few "congratulations" cards to send to our newly engaged friends:


I remember feeling such joy every time a new card came in the mail for us.  There is something about friends and family taking time out of their day to send you well wishes that gets me every time.

Want to know how I made them?

I'll start with the yellow dotted one:

{1} I used my Silhouette to cut out a basic card shape in the white (actually speckled) paper.

{2} Next, I cut a rectangle out of the yellow dotted paper to fit just inside the border of the white paper- also with my Silhouette.
{3} I printed the words "Congratulations" onto the yellow paper with my regular printer. 
{4}Then, I attached a shortened piece of lace onto the yellow card using spray adhesive.


{5} After that, I wrapped a piece of twine around the card twice, having the ends meet in the back and letting it set just at the top of the lace.
{6} I then attached the yellow paper onto the card.  Doing in this way makes sure that the ends of twine are not visible from the inside of the card.
{7} Now, here was the really fun part, making the flower!  I got the idea from the Silhouette Blog
 and I had to give it a try.  For instructions, see the link.

{8} After allowing the flower time to dry, I attached it to the card (using spray adhesive) and used a pen to push down the glued spots without crushing my flower!


{Can you believe that flat flower became this 3-D beauty?  Me neither!}

That's it!  Want to know my favorite part (no, it wasn't the flower)
This card was made using several pieces that we had in our wedding.  The speckled white paper was used in our invitations as well as in our favors and the yellow paper was used for our favor boxes.  The lace was on our invitations; the flower paper (which says "I love you" over and over again) was used on some of our guest cards; and the twine, well it was used everywhere! 

I LOVE that so many pieces from our wedding is being passed on to help celebrate a friend's upcoming wedding.  Maybe I am just sappy like that.


Onto the blue and purple card:
I was inspired by something "peacock" on the internet and decided to construct my card in those colors.

For the shape of the card and the flowers I used the same technique as before. These flowers however, came from a thicker textured type of cardstock than the last card did:


Because they were a heavier material, they required more "wetting" and started to bleed and fray as I folded them.  It turned out great though and the only difference was that these flowers look more like fabric than paper!


{Have I mentioned how in love I am with this flower making technique?}

This time I printed the "Congratulations" straight onto the speckled white paper.

Then I used some DMC thread (that's right... it is not just for needlework!) and wrapped it around the card three times.  Instead of tying it in the back however I made a bow on the front that looks like a couple of little leaves.  When the card is opened up, the string can be seen- but it's not tied back there so it still looks nice and crisp!

Lastly, I attached my flowers in the same way that I did the first card.


Aren't these flowers so lovely?
I cannot wait to make more of these flowers and if that means more engagement cards for friends then even better!  Okay, okay no pressure- I'll make a few birthday cards too.

What about you?
Besides on cards, how else would you use these flowers?  I can't wait to hear everyone's ideas and I am sure my house will be covered with these in no time at all!
Notice: If you have tried to comment on previous posts and were unable, the problem has been fixed.  Please feel welcome to share your thoughts with me and I am sorry for the prior trouble.

Sending my Love,
Kelsie Ann 


Link Love! This post is linked up to: Every Day is an Occasion