Sunday, October 21, 2012

Worth the Wait...

Happy Monday my crafty friends!  Do you ever have those days where it feels like you have a million and one things to do?  That is the kind of week I have had.  Don't get me wrong- I sort of dig it, but it puts a damper on my crafting.  In addition to that, nearly all of my craft supplies are still at my mom's house (I just got married this summer and my craft room is not ready for the supply yet!) so I have to run over there to work on my projects.  Thank goodness she only lives 12 minutes away.


But don't you fret!  I've got a project for you!

It's just not here yet. But it will be- later today. For those of you who check out my blog early on Monday and Thursday mornings, you know that I have my posts up around 9 am. I wanted to let you know that I will be posting today and I ask that you please come back later to check it out. I feel terrible for not getting it to you on time, but I will let you in on a little hint: It can be for Thanksgiving or for anytime and.... it comes with FREE PRINTABLES!

I'm telling you: you don't want to miss this one, even if I am a total bum for making you wait.  You may now boo me and throw tomatoes at the computer.

Thank you for being patient with me and for being such awesome followers!

Happy Crafting,
Kelsie Ann

Thursday, October 18, 2012

Fall Pillow

Hello! Hello!  Happy Thursday everyone!  Today is a good day because my husband is off work for Fall Break (yippee!)  I love the fall and it is certanly in the air around here.  One of our trees outside has already turned entirely red and it is BEAUTIFUL!

 
{The tree on the right is just across the driveway from the one on the left.  Isn't it neat seeing the leaves actually changing from green to red?}

Now that we are all in a festive fall mood, let me share with you a fall pillow that I made:


I'll be honest, I actually made this pillow ages ago (sorry, no tutorial) but I can tell you how I made it.  It's simple really:

{How to Make it}
1. Gather desired fabrics.  I used three (the striped, the white and the brown used for the tree).
2. Sew the contrasting fabric pieces together, resulting in a "front" and a "back" of a pillow.  Keep separate for now.
3. Cut out a fall-looking tree.  This was made before I had my Silhouette cutting machine, so I just drew the image myself.
4. Attach the tree to the fabric.  Fabric glue should work just fine, but if you feel more comfortable sewing it on, go right ahead.
5. Attach ribbon to each piece (front and back), covering where the fabrics join.
6. Apply your message.  This can be embroidered, cut from fabric, whatever you choose.  Want to know a little secret?  Mine was made using a rub-on!  No special kind, just a regular scrapbooking rub-on.  I wouldn't suggest using this if you want to be able to wash the pillow; but it is a great option for wording and if you mess it up, you can just pick it off and start again!
7. Sew the front and back pieces together, leaving one end open.
8. Stuff the pillow and sew it shut!

{I love the bare tree, the colors, the stripes, the message!  All perfect for curling up with a cup of hot cocoa}
  
{Your Turn!}
I hope you have enjoyed this (sort-of) tutorial and are inspired to make your own fall pillow! As always, I love hearing your comments, so don't be shy! Now go off and enjoy this beautiful fall day.

Happy Crafting,
Kelsie Ann
  
LINK LOVE!  Linked up with:  Every Day is an Occasion and D.L Art

Monday, October 15, 2012

Stay Warm & Stay in Style

Happy Monday!  Is it just me or does anyone else feel like the weeks are flying by?  Can you believe that we are halfway through October already?  Although I am sort of a wuss when it comes to cold weather, I welcome the fall and winter with open arms!  I love everything about the crisp air, changing leaves and yes, in time... the snow.  It's all magnificent. 

What is just as exciting is finding cute "cold weather clothes" to sport during this time.  Today I am going to show you how to turn Dollar Store Gloves into stylish and affordable wear for the upcoming seasons.


{Classic Lace Gloves}
I am a sucker for the "classics":  Classic books, classic clothing, everything!  In my teenage years I bought a typewriter just because I loved the nostalgia of it so much.  The classic thing I think I love most?  Lace. (You should have seen my wedding dress!)  It is so delicate and beautiful that it makes whatever it touches look so... classy.

Materials:

Really, that's it.  Lightly glue the back of the lace pieces to the gloves, let dry and enjoy!


{Vintage Inspired Gloves}
You could have probably guessed this by now, but I love vintage buttons, broaches and pins!  My mom and I love going to garage sales, flea markets and the like to dig through piles of "junk" in order to find a few {real} vintage pieces.  We may have been known to buy sets of earrings just to take off the back and use them for something else. What's great is that now, vintage is IN!  That means that stores are selling pieces that look vintage but you can buy them in bulk. 

Materials:
 {I almost used pieces we had from an old pair of earrings until I found these buttons- aren't they just wonderful?  I love that shape}

How to do it:
{It should be a crime for this to be so easy}


{Red Nosed Reindeer Gloves}
I know I jumped straight to Christmas with this one, but you need to be prepared for wintertime too!  My favorite Christmas movies are It's a Wonderful Life and of course the 1964 Claymation Rudolph, The Red Nosed Reindeer.  So, instead of trying to make gloves with a tiny George Bailey on them, I opted for our favorite Red Nosed Reindeer.

Materials:
  {For the vinyl shape, I used "patterned baby deer" from the Silhouette store made by Alaa' K.  I removed the inside design for this craft}

How to do it:
 Simply follow iron-on instructions that came with your vinyl.  For the nose, I suggest gluing it down first (with fabric glue) and then stitching it on snugly.  That way, his nose wont fall off!


{Your Turn!}
I would love to see the designs that you came up with to keep warm and stay stylish this cold weather season.  And, as always I love to hear any feedback that you might have on my projects, the blog or anything!

Happy Crafting,
Kelsie Ann

Link Love!  Linked up to: Every Day is an Occasion and D.L Art

Wednesday, October 10, 2012

Guest Blogging + 5 Halloween Party Ideas + Free Printables!

Happy Thursday everyone!  Today I have TONS of stuff for you!  First things first:  I am guest blogging over at U-Create (my first EVER guest post!) and I would love for you to go check it out.  Then, stay a while and look around.  The girls over there are just too sweet and have a slew of awesome craft ideas.  You will just love them, I'm sure of it.

Secondly, I have another craft for you on here.  Actually it's over FIVE crafts!  I told you today was a biggie.  Still wondering what to do for your upcoming Halloween party?  Or, do you just want some fun ideas for your own family?  Check out these five easy and totally fun ideas for your Halloween gathering:


{"You'll DIE Laughing"}
An easy-to-make treat container that you can "unwrap" to expose a string of Halloween jokes!

This mummy is too cute to be spooky, plus he tells jokes!  Oh, and don't forget the treats hidden inside- it's almost too good to be true!  He's easy to make too:

-Take an old Oatmeal container and cover it with fabric.
-Cut strips of the same fabric and pull at the edges to fray them.
-Write jokes along the strips for people to "unwrap".  Example:  What is a mummy's favorite kind of music? WRAP!  Cheesy yes, but admit it: it's funny!
-Attach the strips together and glue to the container at the beginning.  Wrap the mummy up.
-Fill with candy and share!


{Messy Fun for Everyone}
Individual pumpkins for everyone with treats hidden inside.  Can be done clean or messy style!

For all the kids out there who were anything like me, this activity is fun and best of all.. MESSY!  Don't worry mom, it can be done mess-free as well!

-Get a small pumpkin.  This is a great way to give something personalized to each child without buying several large pumpkins.
-Carve it out and remove the insides just as you would normally.
-Fill it with Halloween treats (inside of ziplock bags)
-For messier fun, put the "goop" back inside on top of the treat bags so that kids have to dig through it to receive their candy.


{Pin the Head on the Skeleton}
A new spin on an old game, this magnetic "pin the head on the skeleton" is sure to be a crowd pleaser.

This game seems to always be fun for any age... and, it's easy to make!

-Draw (or sketch) a skeleton onto a large sheet on paper.
-Cut a head out of magnetic paper.
-Hang the large sheet of paper up on the fridge using magnets.
-Laugh at all the silly places the head ends up!


{Food for Thought}
What event is complete without food?  Here are a few dinner ideas to really spook your guests!

There are three separate things shown here, but they are all very easy to make.

Brain Pasta
-Make spaghetti and add a light coating of sauce (too dark will look less 'real').
-Put half of the desired amount into a ziplock bag, shaping it to look like half a brain.  Do the same with the other half.
-Freeze the pasta until the shape is formed.
-Before eating, remove from freezer and either thaw or microwave to eat.

Spider Web Utensils
-Get plastic forks, spoons and knives (if you will be using them).
-Paint the handles with black non-toxic paint.
-Using a hot glue gun, quickly run back and forth across the utensils.  Let the ends get stuck to the newspaper a little bit.  Give it a second to start drying and then lift off of the paper.  This will cause the strings to bunch up and look like spooky webs.

Creepy Crawly Jello
-Make Jello as instructed.
-Fill a container half way and let it stand in the fridge.
-Place a plastic spider (or other creepy crawly) on top of the layer.
-Top the spider with the remaining Jello.


{What's Your Poison?}
What is scarier than going to choose your drink and finding that your options are "poison" "truth serum" "blood" and "monster guts"?

I made all of these printables myself and would be happy to share them with you:

1. Monster Guts
2. Poison
3. Truth Serum
4. Happy Halloween
5. Blood

{Your Turn!}
I hope you have enjoyed today's post and I hope you went to check out my guest post on U-Create as well!
I am so tickled that they allowed me to guest blog for them and I am also excited to share all these fun and easy Halloween ideas with you over here.  Let me know what you think and if you plan to use any of these ideas at your house.  I love Halloween and I love sharing the "holiday spirit"!  Thanks for stopping by.

Happy Crafting,
Kelsie Ann

Link Love! Linked up to: Every Day is an Occasion and D.L Art

Monday, October 8, 2012

Free Fall and Halloween Printables

Happy Monday!  Is everyone excited for the week ahead?  I know I am- I have some very exciting stuff happening on Thursday (oh the suspense).  Until that point I am working to learn some really neat new blog techniques.  They may be old hat to you or maybe it is brand spankin' new... either way, everyone loves a free printable right?

I have been wondering for quite some time how to make and link my own printables to this blog.  Then I found I Am Momma- Hear Me Roar and she told me everything I needed to know.  She told me all about PicMonkey and Design House Digital: my two new best friends.

Using those websites, I created a few Fall and Halloween printables for you.  Please enjoy them and share with me in the excitement of a new technique!  Here's to learning more everyday, right?!


{Favorite Fall Things}

{I think this one is my favorite.  The colors, the fonts.. it just makes me excited for FALL!}

Do you love it too?  Get it here!


{Cheesy Fall Lines}
{Okay, I am a major cheese when it comes to play on words.  I may or may not have something else already titled "FALLing in Love"... I can't help myself}

Are you a big cheese too?  Get this printable here!
(This one is sized smaller to fit a 5 x 7 frame.  Good things come in small packages, right?)


{The Definition of Halloween}
{I am also a bit of a sucker for definitions.  I don't know why but it seems to add a cuteness to everything it touches.  I would suggest bookmarking dictionary.reference.com right now for future craft use}

Are you a bit of a word nerd too?  Brighten your day with this free printable, found here!

{Your Turn!}
I am so excited to have learned how to make my own printables and I hope that someone has been inspired from this post as well!  Let me know what you like, what you don't, or anything else on your mind!  This is a learning process after all and we are all in this together.
Note: You no longer have to do the word verification to comment on this blog (yay!) If that was holding you back before, then you're free to comment now!  Thank you for your patience. 

Happy Crafting,
Kelsie Ann


Link Love!  Linked up to: Every Day is an Occasion and D.L Art 

Thursday, October 4, 2012

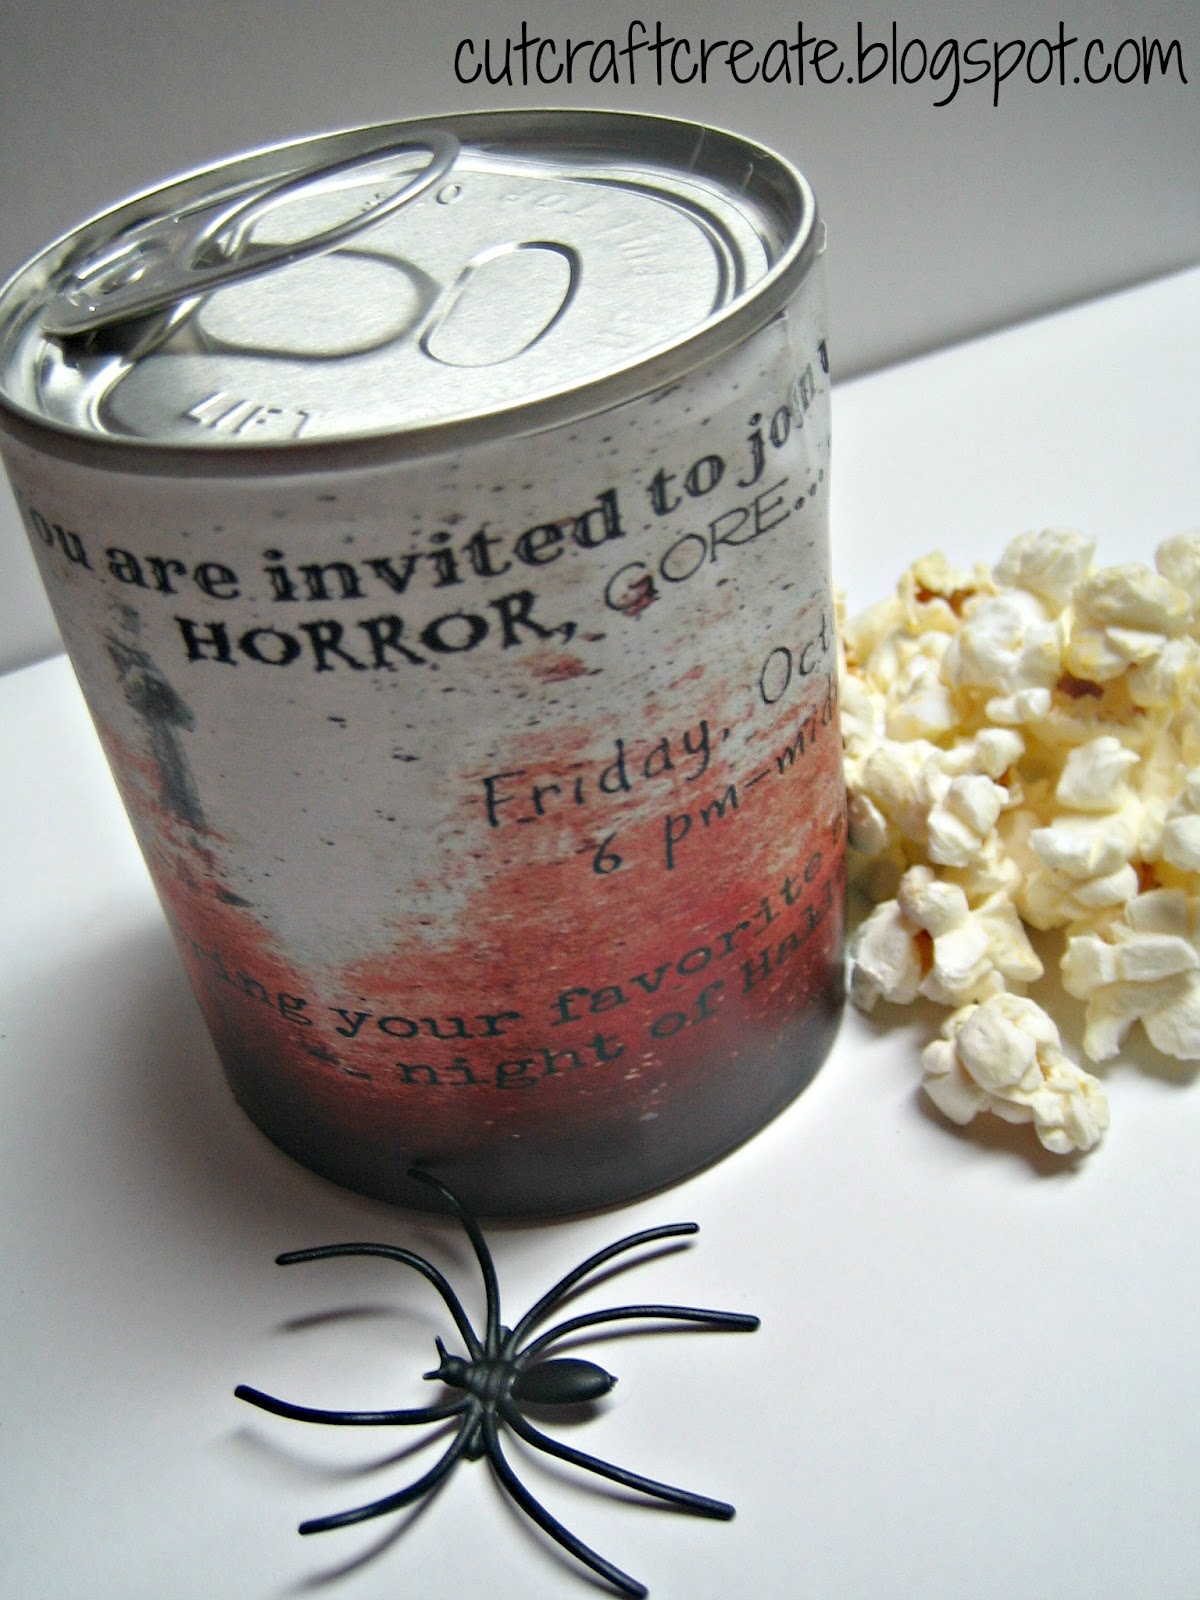
Jumping Spider Pull-Tab Can

I have been itching to try one of those pull-tab can crafts where you put goodies like candy or gifts inside.  Don't know what I'm talking about?  Check them out here, here, or here!  This time however, the can is filled with spiders (fake, of course) and when the tab is pulled, a spring causes the spiders to jump out!  How perfect is this for a Halloween party?


Materials
- 1 can with a pull-tab top
- Fake spiders
- 1 compression spring (I made my own using a slinky!)
- Cardboard


{Step One}
Peel the label from the can.  Then remove the bottom (the side without the pull tab) with a can opener.  I would suggest keeping one spot connected.  Remove everything inside and wash it out.


{Step Two}
Glue your label onto the can.  Remember that the open side will be the bottom when you're finished!

 {I designed this myself using picmonkey.  They have a GREAT selection of "Halloween" effects right now}


{Step Three}
Cut a piece of cardboard that is just slightly smaller than the can opening.  It needs to be able to move, yet not let the spiders fall through it.  Next, glue one end of the spring to the center of the cardboard.

 {If you can't find a good spring at the hardware store (I couldn't), pick up a mini-slinky and just twist it as you pull it apart.  This will create a loose compression that you can cut to any size.  Let us take a moment to thank my brilliant husband for saving this project with his idea!}


{Step Four}
Place the spiders in the bottom (really the TOP) of the can, face down.


{Step Five}
Glue the other end of the spring to the center of the open lid (the actual bottom of the can).


{Step Six)
Place the spring fully inside of the can, making sure that the cardboard lays right over the spiders.  CAUTION: Be careful not to twist the spring too much or it may not spring out correctly.  Then close the lid and glue all around the edges, sealing it up.

 {It is okay if the bottom looks messy.  No one will see it and it is more important that it stay closed}


That's it!
Now all that is left is to give it to a friend and watch them JUMP as the spiders fly out at them!  I think all the pull-tab crafts are great but this one is really neat for all of you Halloween Scare fans out there... and it goes perfectly for a scary movie invitation!

I apologize for not having a video/pictures of the spiders jumping out.  Our computer has been experiencing some problems and I am unable to open any video editing program and currently, even the video itself!  I promise though, it works and is super fun!

Your Turn!
What is your favorite scary movie?  Or... are you more of a Great Pumpkin Charlie Brown kind of person?  (I like both kinds!)

Happy Crafting,
Kelsie Ann

Link Love!  Linking to the Craftaholics Anonymous Fall Frenzy Link Party! Every Day is an Occasion and D.L. Art

Monday, October 1, 2012

Homemade Cards for Any Occasion

Receiving a card in the mail is one of those special moments that can really brighten someone's day.  Receiving a handcrafted card pushes the envelope even further (pun intended) by showing someone that you really care.  Taking time to make and send a homemade card is a timeless treasure made especially valuable during this instant message/texting/tweeting world we live in today.

That being said, here are some cards that my mom and I made for a local fundraiser.  Feel free to grab some inspiration from them.  Each set comes with a card and matching envelope:


Christmas/Winter
{That reindeer stamp is one of my very favorites- isn't it beautiful?!}


Halloween

{The spider was made sort of 3-D looking so it jumps right off the card.  Spooky!}


Love/Valentine's Day
{Loving the "lumpy bumpy" stuff on the card?  Learn how to make them in any design HERE}


Mother's Day
{You can make 3-D flowers like this yourself too!  Just check out this post for the how-to}


Father's Day
{I love how the "BEST" pops out from the card}


Birthday

{This was my first craft to use bakers twine and I loved it!  It looks like a little gift wrapped up, doesn't it?}


{MY FAVORITE} Good Luck
{I love the colors, the brackets, the birdcage on the envelope... I love it all!  Plus, "good luck" cards can be used for almost anything}


Your Turn!
Next time you want to show someone how special they are to you, forgo the tweet stating that #momrocks and get crafting!  I can promise that the gesture will be appreciated (and it's fun for you too!)

Happy Crafting,
Kelsie Ann

Link Love!  Linking up to the Craftaholics Anonymous Fall Frenzy Link Party and Every Day is an Occasion!