[Disclosure: I received washi tape product for free from Chickydoddle. I am in no way obligated to write a positive review and all opinions are my own.]
As I searched Etsy for some washi tape, I stumbled upon this Cute Bunny print and I was in love! I just love bunnies. My son's nursery is Peter Rabbit themed and we even named our small business Chubby Bunny, Happy Home after my son who we called "Chubby Bunny" when he was a babe. The bunnies on this tape are also holding eggs so I can use this tape in my Easter scrapbook layouts! As I searched through Chickydoddle's washi tape I found several others I loved and immediately contacted the shop owner to ask if we could collaborate.
(Check back on Friday for a few of my other favorite prints, how I used them and a GIVEAWAY from Chickydoddle!)
Now onto my first washi tape projects...
Maybe you're organized and get mail sent out at just the right time. Or, maybe you are a hot mess like me and thank you cards are still sitting in a pile on your table 8 months later. If you're like me, follow along to see how I turned a boring old crate into an "outgoing mail" box! This cute print is sure to catch my attention and it's a great place to store all that mail that needs sent out.
I used the Hearts in the Sky print because it's bright and just lovely. Now follow along carefully, these instructions get tricky. Ready? Okay... pull the tape off the roll and press onto your crate. That's it! This washi tape is sticky enough to stay put but can easily be pulled off and readjusted if you need to move it.
I especially like that this print lines up with itself so you can stack the strips of tape and have one continuous design.
This tape is also thin enough that I was able to have two pieces meet up (on the side of the crate and the top of the crate) without it bunching up. It's practically seamless!
Can you believe that is two pieces that meet up and not one folded over the edge? Even I'm impressed. I'm definitely a washi tape person now.
You could cover the inside of the box too but I opted to leave it bare. I did finished off the inside edge with one strip of washi though so that the corner had less wear and tear.
Easy peasy. Now I can hold all those cards that I used to always forget about. I also put a clipboard in it for any extra notes I might want to remind myself of. For example, I clipped a note on this bundle reminding me to send the gifts that go along with the Mother's Day cards in the box. {This was just an old clipboard I had but you could totally washi it up too!}
Okay, I have one more project to share...
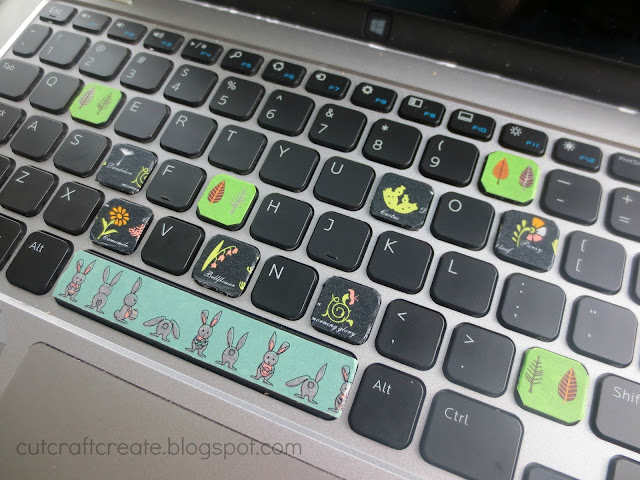
This isn't a new idea, as a matter of fact, you can search pinterest and see a slew of them. I've been itching to try it and thought these prints would be perfect!
The Modern Garden print is the most perfect design for a keyboard. The black background matches the other keys but the lovely pinks, greens, oranges and whites add a dainty touch.
I cut them into squares and just pressed them down around the keys. I think I might go back later and round the corners though so that they aren't tempted to pop back up.
I also threw in some Woodland Leaves washi for an added pop of color and to continue the floral/leaf theme. My husband always just says "you love leaves" when I say I like something and can't explain why I'm so coo-coo over it! Apparently that is my "thing" that I always gravitate to! I cut the corners on this print instead of rounding and I definitely think I will be changing those out for a more rounded look.
And because I love that Cute Bunny design, I added it as well. Hey, bunnies are outdoors... it still fits my theme! Love that little bunny tail.
{That's it}
How did I do on my first washi tape projects? What is your favorite craft to do using it? Don't forget to check back on Friday for more washi projects, a review on why I love this seller and a GIVEAWAY you don't want to miss!
Happy Crafting,
Kelsie Ann


No comments:
Post a Comment