Saturday, April 28, 2018

Re-purpose a Desk into a Changing Station!

I like to give my husband a hard time (as many of us do with our significant others) but I have to admit: the man steps up every single time I have some furniture based dream in my head. Whether that's a plan for a detailed wall collage, a made-up dresser design (post coming soon) or a baby changing table, I tell him what I want and he somehow magically makes it happen.

And y'all I'm going to be real honest with you. I love this changing table. I love it so much. But I've literally used it for changing diapers about a dozen times between our two children.  Oh it makes my husband so mad. He doesn't understand how awesome it is as a whole that it doesn't really need to be used for changing diapers anyways. Oops. (You never know what kind of a parent you are going to be until you are one, am I right? Turns out I'm a "change 'em on the floor" kind of mom).

So here it is as it stands in all its glory today:


Want to know the story? I'll keep it brief. I didn't love any of the changing stations that I found online or in stores. I honestly can't remember why, but they either didn't have the right kind of storage or I didn't like the color/material, etc. I explained to my husband the kind of drawers I was looking for (some very shallow for small things like nail clippers and diaper creme, others very deep for cloth diapers and receiving blankets) and he suggested that we use this old dorm room style desk that he had from college:


"That's perfect!" I thought, except I don't feel comfortable with the changing pad just sliding around on the top. So what did my amazing and patient husband do? He made a custom top for it that can easily be taken off so that someday we can use this as a desk again if we want! Here's what it looks like (pre-paint job):


It can also be flipped the other way so that the front has a lip on it instead. As you can see in the above and below photos, the wood goes down farther along the outside edges "locking" it onto the desk so that it doesn't slide around.


He made sure to include an open but boxed in area for me to keep things I didn't want to get in and out of drawers every time to use (like the wipes warmer which literally never got used- again, you don't know what you're going to use until you're in it!)  This design is so simple and easy but really hit the nail on the head in becoming exactly what I wanted.


We then painted the top attachment and the original desk in a taupe/light brown color (to match my son's Peter Rabbit Nursery)  Here's how it looked in my son's room (first photo) and then now in my daugher's room (second photo):


{Using a desk also allows you to have the perfect space underneath for a laundry basket or trashcan. We had the tall trashcan for cloth diapers off to the side}


{I can't express the frustration I have with terrible lighting in my house. You'll hear me complain about it in almost every blog post. We have these amazingly adorable nurseries and you can't tell because even my best editing still looks like an old film camera! Anyone else? Commiserate with me!}


What do you think?
Are you sold on the idea of using already owned furniture to DIY your own diaper changing station? Not only are there some more options for styles/design but you've got great underneath storage for baskets AND best of all you can easily remove the top and keep using it long after your babe has outgrown the diaper phase! I'm so tickled that my husband came up with this for us and although I rarely change a diaper on it, it gets plenty of use and love every day!


Wednesday, April 25, 2018

Printable Questionnaire & Coloring Page about 'Grandma'

Although grandmas deserve a private island, 62 million dollars and a personal army of adorable snuggly puppies that house-train themselves & bring fresh beverages on demand, most of us probably can't give that to our amazing moms this Mother's Day. But for a grandma, hearing the sweet words & drawings from their ever-precious grandbabies is just as good. That's why I put together a few printables for you to have your child fill out (or you write down their answers for them) and color to show grandma just how special she is this Mother's Day.

You might want to throw in some chocolate too. And in my kids' mamaw's case: a large Code Red Mountain Dew.  Can't go wrong with "from the mouth of babes", chocolate and caffeine. It's the triple threat.

Just download (link below pics) and print! 

Enjoy! Happy Mother's Day. [note: on my printer I had to click "shrink to fit" so that it didn't fill it to the edge. I recommend testing one out before printing multiples to make sure your computer settings are correct.]


Download questionnaire HERE


Download Coloring Page HERE


Because I have the best mom in the world who actually reads all of my blog posts, I can't share our finished one here but I'd love to hear some of your little ones' sweet responses! Share them on my facebook page or in the comments below!


Thursday, March 15, 2018

My Favorite Baby Shoes- {Review & Giveaway}

Have you ever received a gift and thought it was cute and then after actually using it you became obsessed with it?  That happens with me all the time. Or sometimes I think I'm going to love something and end up hating it.  It just goes to show that I don't know what I like!   These days I mostly buy products for my kids because, well #momlife.  When I find something really really good, I like to share it with you because I know a lot of you are moms and dads too.  Even better? When the company lets me give away a pair!!! Guys, I'm in love.


[Disclaimer: I have received free product from Clamfeet in exchange for an honest review.  I only collaborate with companies that I personally use and trust.  All opinions are my own and from my own experience.  Giveaway items are a gift from Clamfeet.]

So here's the deal. I received a pair of these adorable baby shoes (in the gwynth style) as a gift when my daughter was born.  I'm not big on putting babies in shoes but I gave them a shot when the weather got cool.  That's all it took. I. was. hooked.  She just recently has started to outgrow them so I looked up their website to see about getting more. Upon scrolling through all the beautiful prints and reading the backstory about this amazing small business I loved them even more! I'll keep it brief but let me tell you why I like them so much and what makes this company extra special:


Why I like them:

Number 1: They stay on babe's feet. Obviously this is a big deal.  We've only owned about 2 brands of shoe that actually stayed on our baby's feet.  This leads me to my next point:


{Moccasin style elastic at the ankle keeps these little shoes on and ready for action!}


Number 2: They are half the cost of the other "stay on their feet" shoe that we own.  I used to be a big advocate for the other company- that was until I found these. I'm never going back.

Number 3: They are machine washable. That's right. I literally toss them into a regular load of laundry and they come out good as new. I've washed ours multiple times and they look amazing, especially considering how dirty my daughter gets them!


{Same shoes about 1.5 hours apart after being washed in the machine with a load of kid's clothes}


Number 4: They're cute!  I'm shocked at how many cute fabric prints they have available for boys and girls.

{These are the 2nd pair we've owned, in print style June... my daughter's name! It was a sign I had to get them!}


Here's my top 'boy' prints:


And my top 'girl' prints (that I don't own... yet):


Of course, lots of these prints are actually pretty gender neutral.  They also have more solid colored options if you aren't looking for a wild print!  Check out the full list of options (because I don't have room to share them all here!)


So what makes them so special?


Not sold on them yet? How about this:

Number 1: This business is owned and operated by a woman named Julie.  I don't mean she's the big CEO that oversees everything I mean, she literally sews your shoes.  This is a true small business success story and my heart is melting over it!  (check out her instagram to see her setup!)

Number 2: All of her patterns are either created by Julie herself or independent artists (and printed in North Carolina!) How's that for unique product?


Number 3: I know I said this in the previous bullet points, but they are WASHABLE!  If you have kids already, you'll know this is enough said.

Number 4: This is a biggie.  These shoes are made from completely vegan materials and lined with an organic lining.  Do a little research on the other shoes you are buying and you will see that few use sustainable resources like Clamfeet does! Cute shoes. Great price. Good for the environment. It's a win-win-win.


{I love how flexible these shoes are! I'm a big believer in the idea that kids should go barefoot but that's just not possible sometimes. That's why I love shoes that give my child some protection while also allowing for foot movement and being able to feel their surroundings better than with a standard hard sole}


Is there anything I don't like?

Of course, no product is perfect.  I do have my complaints.  Although it says that "baby shoes" (sizes 1-5) are indoor/outdoor, the larger sizes are meant for indoor use only.  (This is because the smaller sizes are more of a moccasin style where as the bigger ones are more of a slipper sock style). I would LOVE to get a matching pair for me that I could wear out and about!  I may have to get some with a grip bottom and wear them outside anyway... be a rebel and all.  She will substitute any size shoe with the "grip" bottom though if you ask- so don't worry about your little walker sliding around!

(For the record, my daughter walked for a few months on the faux suede bottom and had no trouble sliding around as she walked- although she did have a little trouble climbing the plastic slide!) but we have mostly carpeted floors so if you have any doubts, ask for the grip bottom!


{This is the grip bottom. See my "before & after" picture above for the faux suede}


I bet you are pretty psyched about these shoes now aren't you?  Well hold on to your hats folks (I've always wanted to say that) because we're GIVING A PAIR AWAY!!!  It's easy to enter, just follow the Rafflecopter prompts below and complete the tasks.  One lucky winner will be chosen randomly on March 30, 2018.  Make sure you are following Cut, Craft, Create on facebook because I usually post some "bonus entry" options for my giveaways that you wont want to miss!


Giveaway is for (1) pair of Clamfeet shoes in the size of your choice (in sizes 1-4) and fabric of your choice.

a Rafflecopter giveaway


Friday, March 9, 2018

Library Books (dry erase!) Sign & Storage

If you know me in person, you would know that I'm obsessed with books.  Me personally? Well no- I haven't read anything in the last 3 years that wasn't based around some parenting philosophy (and even those I skimmed for the good parts).  But children's books- yes. Most definitely. One hundred and ten percent, can't get enough, completely and utterly obsessed. It's been a while since I've counted up our books but I think we personally own over 300 stories.  We also go to the library every week for story time and to check out between 10-15 new titles.

Because we have books in every corner of our house, car and lives I needed a place to keep library books organized and separated.  This has become especially true since I've started hitting up the library's book sales. Even though I black out the labels, I still occasionally try to return a book that I bought from them! I've made my own picture frame dry erase board before and I thought I'd take the same concept and make myself a little library books reminder board!


I already had this frame because it's such a nice size and shape I was saving it for something!  Head to your local thrift store to find a big frame for cheap.  It doesn't matter what is on the mat or photo area because it'll be covered anyways!


Here's what you'll need:


It's so easy to make! 

First, remove the mat from the frame and use it as a pattern on the wrapping paper.  When cutting, make sure to give an extra half inch on each side to allow the wrapping paper to fold around the mat after it's cut.

Cut it out.


Glue down the outside edges of the wrapping paper to the mat.  For this type of project, stick glue works just fine. Cut a large "X" out of the middle and trim the wrapping paper down so that you have just enough to fold around the mat on the inside as well.


Glue it down.


Next, you need to make the actual sign.  I would have printed up something a little nicer but my printer was out of commission (as is often the case) and I wanted it done NOW so I wrote it out by hand.  It looks pretty good for handwritten and it gets the job done. If you have easy access to a printer though, you might want to type something up.


Glue it down centered in the hole of the mat. (add tape if you want it extra secure)


Put the back of the frame back on and that's it!  My son had fun drawing on it immediately.  Luckily I went to erase it shortly after because I didn't realize that he was drawing with a sharpie.  Oops!  Note: Permanent marker is not easily erasable!  Use dry erase ones for daily use!


Hang your sign on the wall above a wooden crate.  I put ours in the empty corner between my kids' rooms since library books are split between them and it's the perfect space for this!  You can attach the marker with string, or just lay it on top of the frame like I do.  It's tall enough the kids can't mess with it.


I wish I would have made my writing in black instead of grey. I thought it'd be better in making the dry erase marker stand out but its hard to see in pictures. (It's visible in person).  Otherwise, I LOVE how this project turned out. We use it every week!  Bonus- my kids love it too!


Friday, February 2, 2018

Little ONE, Big Adventure [Little Girl's 1st Birthday Party]

I had some other DIY posts I've been wanting to share with you but after my daughter's first birthday party last weekend, I just couldn't wait to share and decided to bump this one up!  See, here's the thing: I apparently created a theme that doesn't exist. At least on Pinterest (which in the crafting world is really all that matters, right?) I didn't do this to be ultra creative or to get new blog content.  As a matter of fact, I wish I had a little more help in deciding how to pull it all together because as it was, I was up making things the night before the party as my mind finally figured out what I wanted to do. Or maybe a little because I always work last minute like that.  But let's go with the former... it makes me sound less of a hot mess.

[Disclaimer: This post contains affiliate links. Purchasing products through these links helps me earn a small commission at no extra charge to you. This allows me to bring you more free content.  Thank you for supporting my blog!]


When deciding the theme I had 2 points I wanted to hit:
1- I wanted a theme that demonstrated some sort of "girl power". Although we are all about tutus and hairbows at our house, it always kind of rubs me wrong when people automatically call my daughter a pretty princess. Her bedroom is decorated in lovely pastel watercolor flowers and quotes (lots of quotes) about being curious, growing wild and achieving her goals. I want her to know even at age one that there is more to life than being a pretty princess (not that there is anything wrong with wanting to be a princess either- just... be a capable one).

2- I also wanted to incorporate a theme that actually related to her. This is hard to do for a first birthday because they aren't into that much. We don't let our kids have screen time before age 2 so she doesn't have a favorite character & her favorite toys are whatever brother is playing with. But boy does this girl love to climb. She climbs EVERYTHING, all. the. time.


So here's what I came up with:
{I made this invitation on Picmonkey using backgrounds and mountain images I found on google}


When asked to explain the theme I would say "Little ONE, Big Adventure. It's mountains, clouds, very 'climb that mountain' seek adventure sort of theme".  When I tried to look this up on Pinterest  I found that everything was either too woodsy themed, or airplane themed. I also found that every single one of those ideas tended to be very masculine. Hmmph.

Who says girls can't be adventurous too? So this is what I came up with. Blues and pinks, mountains and clouds. Simple and absolutely perfect.


Now... onto the party details:
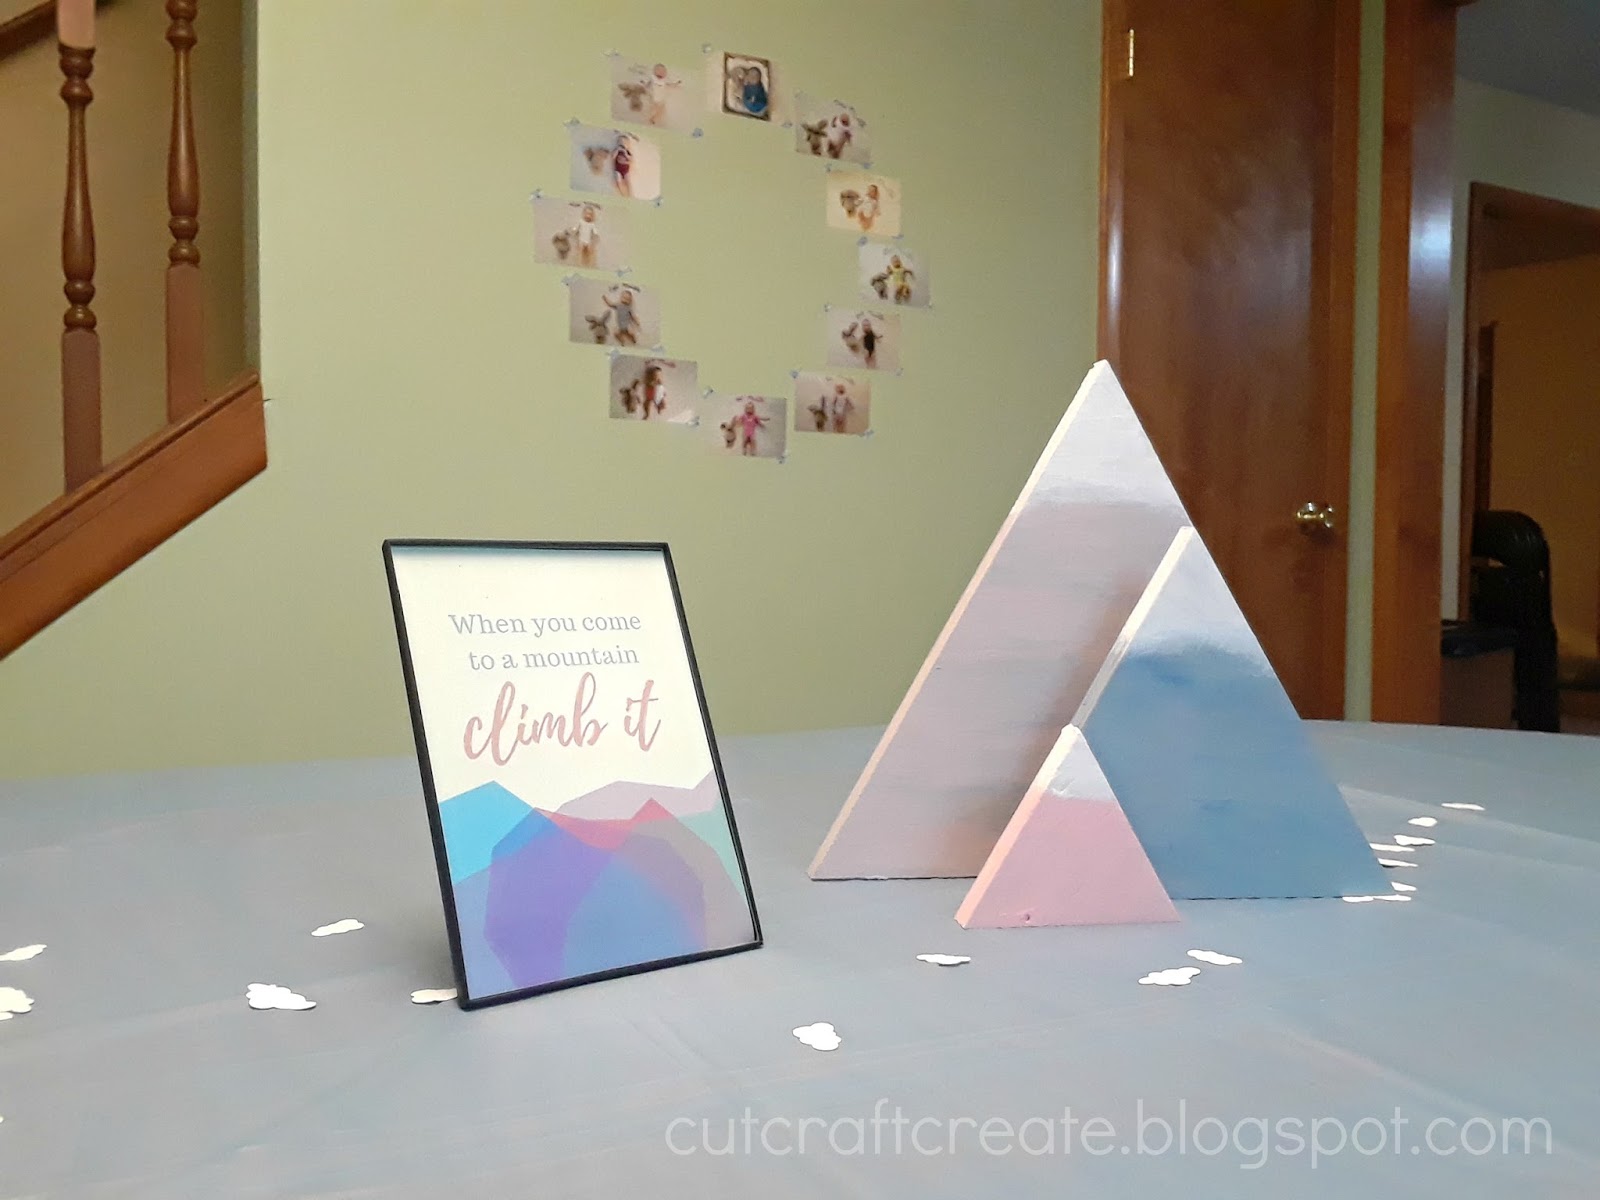
For the decor, I kept it simple. I had my husband cut out wood triangles in varying sizes. Then I painted them to look like mountains in blues and pinks. These went on the tables.  On some of the tables I also included some simple framed quotes that I also created on Picmonkey. Want to save yourself some time? I've included links to my designs so you can just print them off for your own party for free! Find them under the photos. ;) I've got your back jack.


{Love the sort of rugged wood grain look to them!}


Here are the printables, which print perfectly in a 5x7 size:


I don't know why the background looks yellowed (yes I do- my house has terrible lighting!) but behind the words it prints WHITE.


I also made cloud confetti to sprinkle on the tablecloths. 


I kept the wall decor simple and all about my daughter. On one wall I hung a mountain banner that I made out of Cardstock (and white paint for the peaks!) an "about you" chalkboard looking sign and some of my favorite photos from the moments following her birth.


{B&W Photo Credit: Elizabeth Hannah Studios


On another wall I included a newborn photo and months 1-11 (she wasn't 12 months by the time we had her party!) that I took with her bunny to show how much she has grown.


I hung some large Pom Poms from the divider ceiling and also included a banner that my friend made for me a year ago to hang next to our  Letterboard which displayed a fun little bit about her party "to dos".


But my favorite element was this "Adventure Bank". I had seen some really cute ideas online about making a bank to save money up for trips or other adventures, but I wasn't interested in people putting money in it. No.. I wanted adventure ideas! So I took one of those glass blocks with the opening on top (often used as a bank), added a vinyl design (found on google) put a piece of paper on the back and set it out with instructions on what to do.


I wanted our family to come up with some fun things for our daughter (and of course the rest of us) to do over the next year. It could be small adventures like a picnic in the park or big adventures like visiting a new state.  Here are some of the things people came up with:


As you can see from the picture on the right, our three year old also filled out a few of them himself.  He told me all about what each paper said. It. was. adorable.


Now this sits up in my daughter's room and we will work to empty this bank over the next year and maybe even add a few new ideas as we go!


I didn't forget about the cake!
What would be a party without cake? Although I didn't make it, I wanted to share photos of her smash cake (made by Spoonful of Sugar) and our adorable custom cupcake toppers from one of my favorite etsy shops: Shabby Mint Chic Party.  Even though this girl can't go one meal without smearing food in her hair, she managed to be the cleanest most delicate smash cake eater ever known and literally made no mess at all. Seriously, her tutu was as clean as when she started. *eye roll* Oh well, she still acted awfully cute for the camera ;)


{Custom cupcake toppers from Shabby Mint Chic Party. She has made so many awesome things for me, if you don't see what you want on her site, contact her and she can probably do it!}


Yes, that's a makeup brush in her hand. It's clean and my kids love it. She wouldn't let it go! As you can see I also painted large mountains that I stuck to the wall for a photo backdrop. All I used was poster board, paint and sticky tack (to hang it up!)


Last but certantly not least- her OUTFIT!

What's a birthday party without a special outfit? Especially when we own our own etsy shop that specializes in infant & toddler apparel.  My lovely mama created this ah-mazing tutu and we created the onesie design based off of an image we found and loved online (that just said adventure under the mountains). I wish the light pink showed up better in photos. It's absolutely perfect!


If you'd love a custom outfit for your little one's birthday, shoot us a message on our etsy page and we'll hook you up! *This exact mountain design not available for purchase because it is not our design*


{Isn't she darling though?}


What do you think?
How did I do in pulling off this sort-of-made-up theme? I'm so pleased with how everything turned out and I think it was absolutely perfect for celebrating my curious, climbing sweet little one year old on her special day. I would love to hear what themes you did for your baby's first birthday so please comment below and let me know!  We've got years of parties ahead of us, so I could always use new ideas!